
09 Steps to Reduce Excel File size || Evaluate Existing Formulas

09 Steps to Reduce Excel File size || Evaluate Existing Formulas
Every Excel user generally facing some common problems, likes – Excel file too large for no reason, Excel file too big to open, after opening Excel file slow to respond, cell movements become very sloth, Excel filtering very slow, overall Excel performance slowing down.
Based on that we can categorize the issues into three parts:
➢ Type-1: Why would an Excel file increase in size? Why excel file so large?
➢ Type-2: How to reduce excel file size? How to compress large files to small size?
➢ Type-3: Why Excel is too slow? How do we speed up a large excel file?
Accidentally, Excel size increases high without any reason and jumped from KB (Kilobyte) to MB (Megabyte). Sometimes, sending a large Excel file (>50 MB) via email is restricted due to its limitation. This situation makes everyone very irritating to handle an Excel file and it is tough enough to make a report of this database/Excel file.
This is mainly happening due to the use of enormous Cell Formatting likes: various types of fonts, font color, background color, extends the borders up to the whole worksheet, inserts more text boxes, etc. If an Excel file contains more data, formulas, pivot tables, and images in it, definitely file becomes heavy in size.
So, every Excel user should follow the below 09 steps to compress an Excel file, speed it up, evaluating the formulas linked to the main database easily.
HOW TO ‘REDUCE EXCEL FILE SIZE’ & ‘EVALUATING FORMULAS’ IN THE MAIN DATASET
(01). Step-1: Reduce Excel File Size || Create a New Worksheet & Transfer the Main Dataset ||
This step is very crucial to reduce Excel file size and speed up the Excel file as well. Simply follow step by step.
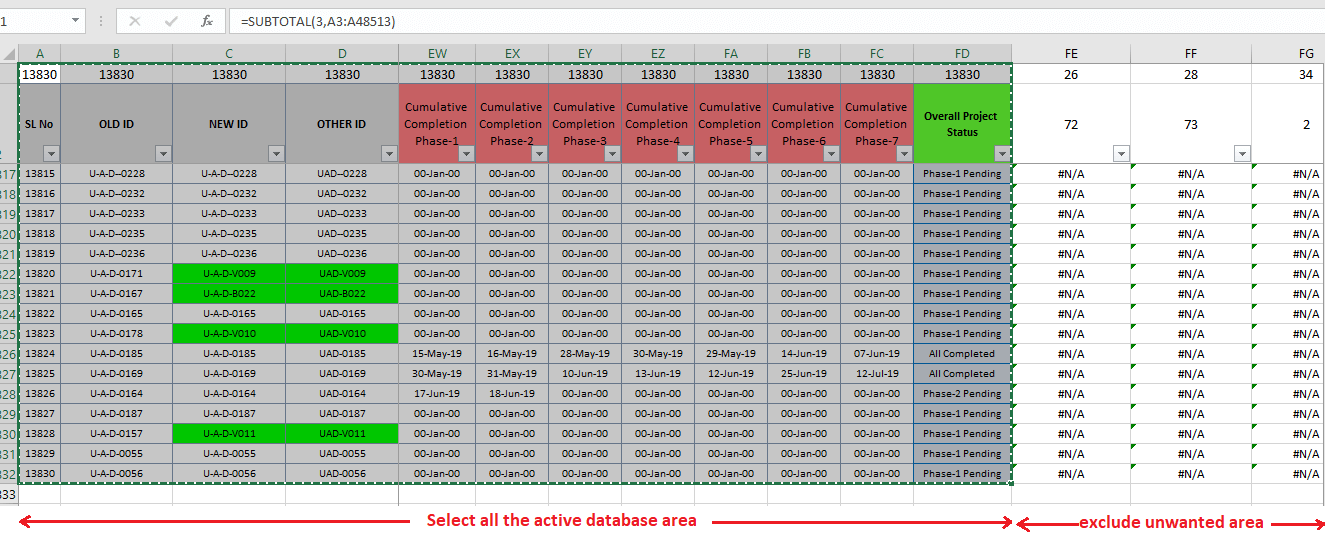
(01) Select the Entire Active Dataset Area/Range
First, select the whole active area of the main dataset by pressing Ctrl+A or applying Ctrl+Shift+ Right Arrow (➡) and then Ctrl+Shift+ Down Arrow (⬇) ➪ copy the area or range by pressing Ctrl+C (Exclude unnecessary areas).
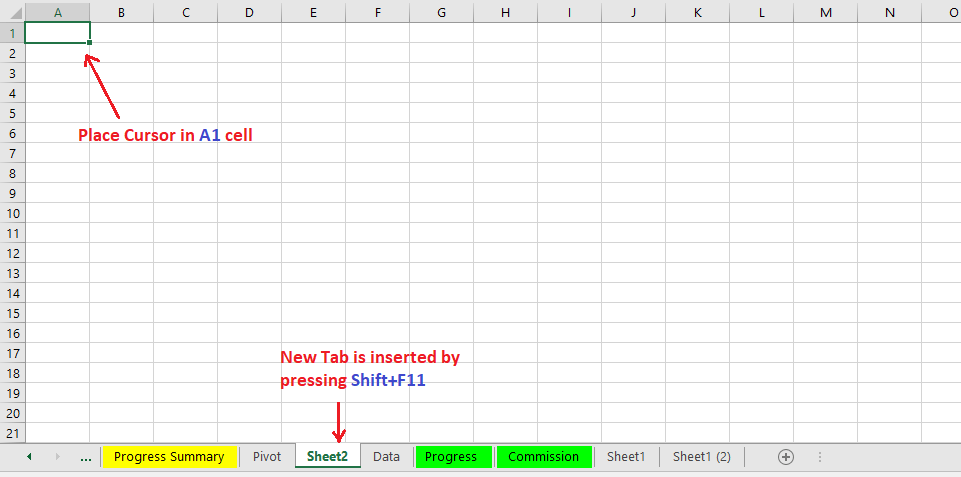
(02) Create a “New Worksheet” either in the ‘Same Workbook’ or in the ‘New Workbook’
Create a new worksheet in the same workbook by pressing Shift+F11 or create a separate new workbook by pressing Ctrl+N.
• Method 1: Create a New Worksheet in the Same Workbook (Shift+F11)
Remember that we always prefer to create a new worksheet in the same workbook (by pressing Shift+F11), if there are many formulated worksheets interlinked with the main dataset (worksheet) either by the formulas or by the pivot table(s). This is because when we copied the main database to a new worksheet, all interlinks are broken, the data source of Pivot Tables has been changed, formulated worksheets will show #REF! Error, Pivot Tables are not updated after refreshing. In this situation, it is necessary to evaluate the formula, rebuild the interlinks, change the data source in the pivot table which will automate the workbook.
• Method 2: Create a New Worksheet in the New Workbook (Ctrl+N)
On the other hand, if the main dataset (worksheet) is in a single worksheet and there has no interlinking with the other worksheets (technically said that there has no worksheets dependency), then we prefer to create a new workbook by pressing Ctrl+N for replacing the main database.
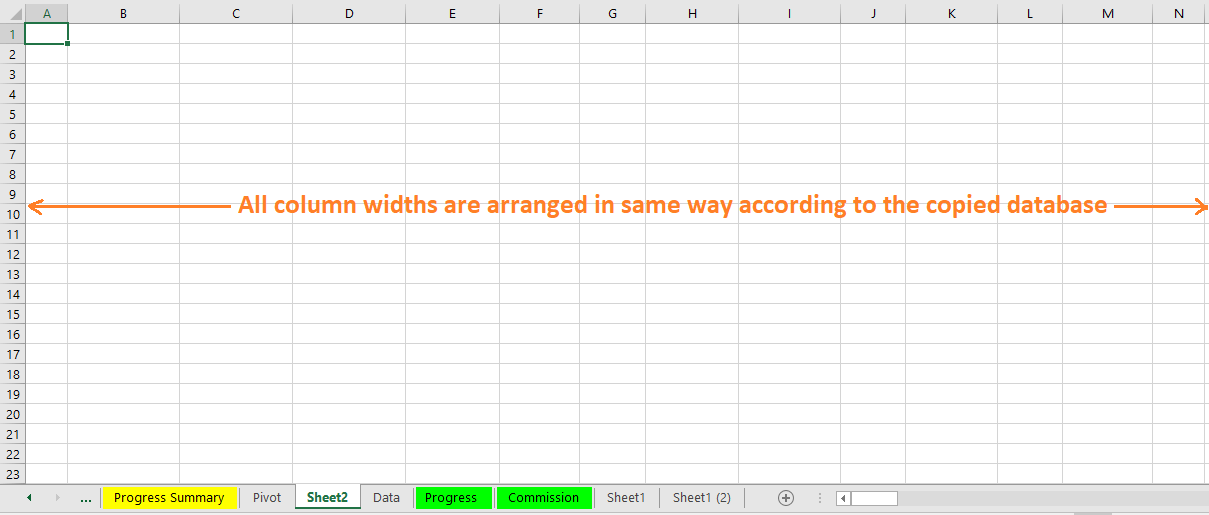
(03) Apply “Column Widths” in the ‘Paste Special’ dialog box
After copying the old dataset, select a cell (i.e., A1) in the new dataset (worksheet) ➪ then press Alt+E+S+W (sequentially press Alt, E, S, W) or Alt+Ctrl+V+W (press Alt+Ctrl+V, then W) which will select the ‘Column widths‘ in the ‘Paste Special’ dialog box ➪ Press Enter or click OK.

As a result, Column widths are adjusted in the new dataset (worksheet) similar to the old dataset (worksheet).
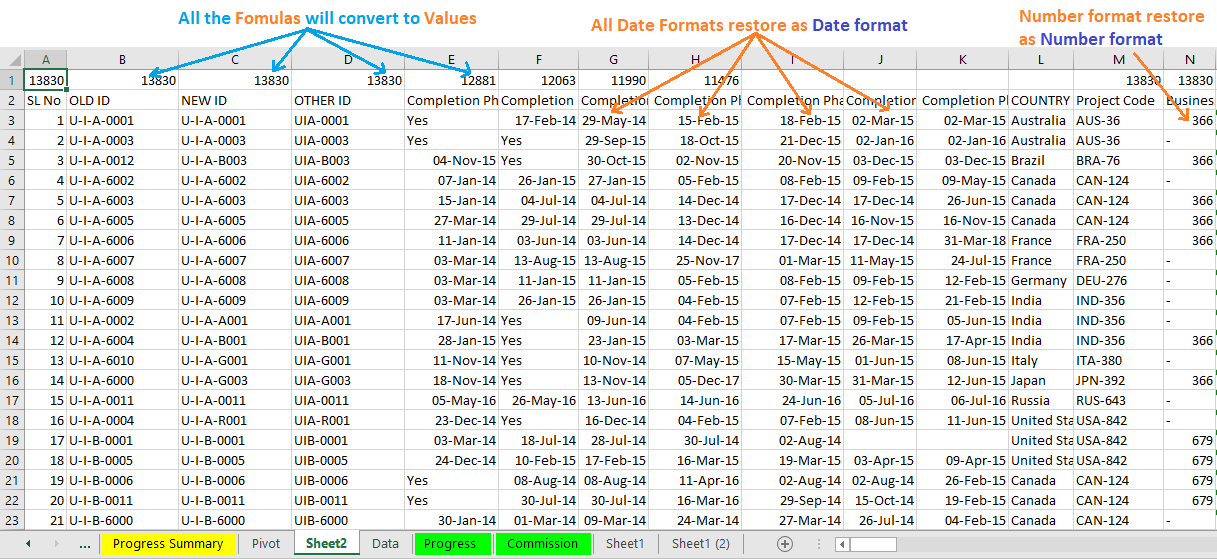
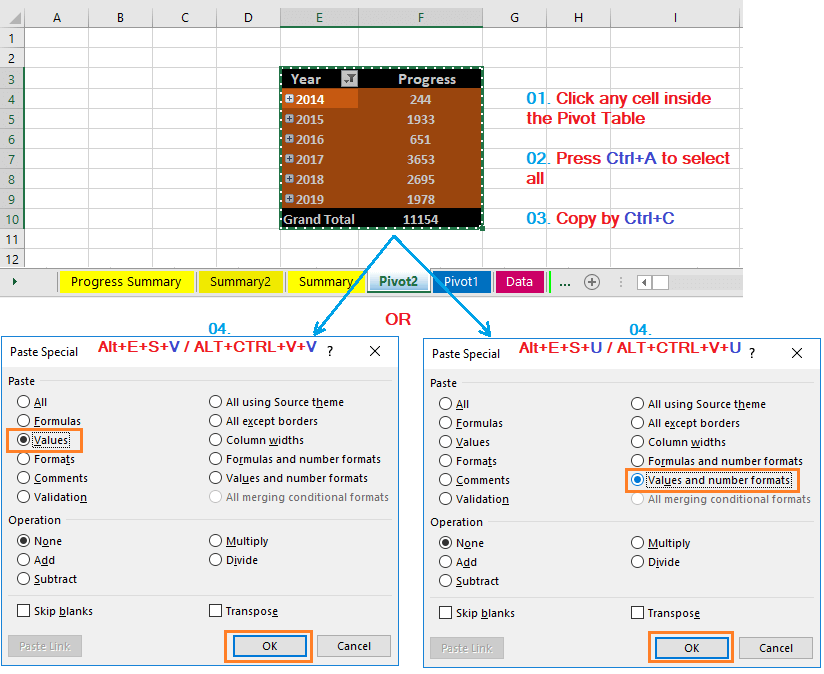
(04) Apply ‘Values and number formats’ in the ‘Paste Special’ dialog box
After copying the old dataset, select a cell (i.e., A1) in the new dataset (worksheet) ➪ then press Alt+E+S+U (sequentially press Alt, E, S, U) or Alt+Ctrl+V+U (sequentially press Alt+Ctrl+V, U) which will select the ‘Values and number formats‘ under the ‘Paste Special’ dialog box ➪ Press Enter or click on OK.

As a result, all the cell formatting removes from the pasted dataset. Number, date, and currency formats remain intact otherwise, all the formats will be changed to number formats. But one constraint is that all the formulas inside the database will convert to values.
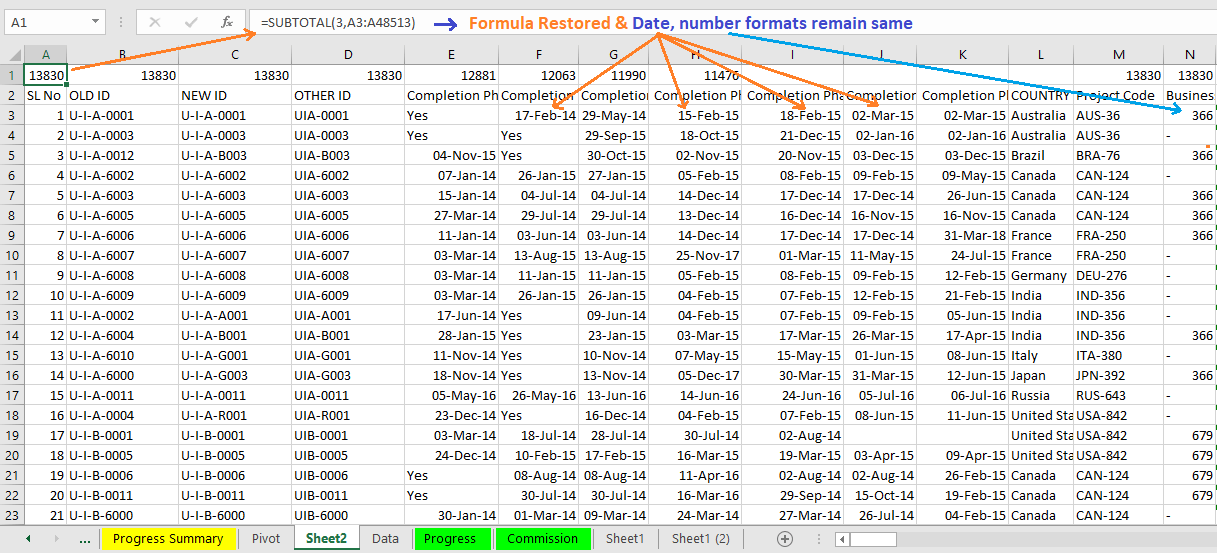
(05) Apply ‘Formulas and number formats’ in the ‘Paste Special’ dialog box
To restore the formulas from the copied dataset to a new dataset we follow the below steps:
Select all (Ctrl+A) and Copy (Ctrl+C) the old dataset (worksheet) ➪ then select a cell (i.e. A1) in the new dataset (worksheet) ➪ press Alt+E+S+R (sequentially press Alt, E, S, R) or Alt+Ctrl+V+R (press Alt+Ctrl+V, the press R) which will select the ‘Formulas and number formats‘ in the ‘Paste Special‘ dialog box ➪ Press Enter or click OK.

As a result, all the cell formatting removed, and all the formulas safely pasted over the new worksheet.
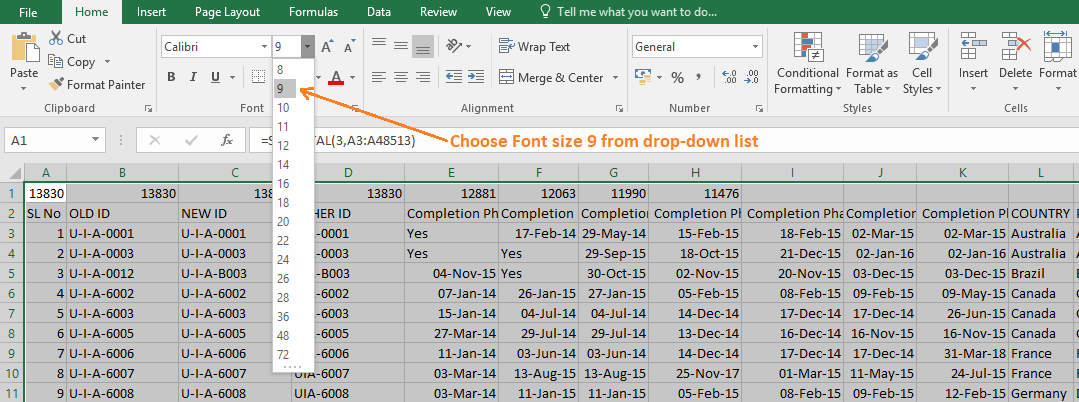
(06) To Decrease the Font Size
It is suggested that small font size decrease the load of Excel file and work faster. In this case, we choose the Font size from 11 (default value) to 9.

Select the new dataset (worksheet) by Ctrl+A ➪ then press Alt+H+F+S (sequentially press Alt, H, F, S) to activate the Font size drop-down box ➪ either choose Font size from the drop-down list or manually type 9 ➪ press Enter.
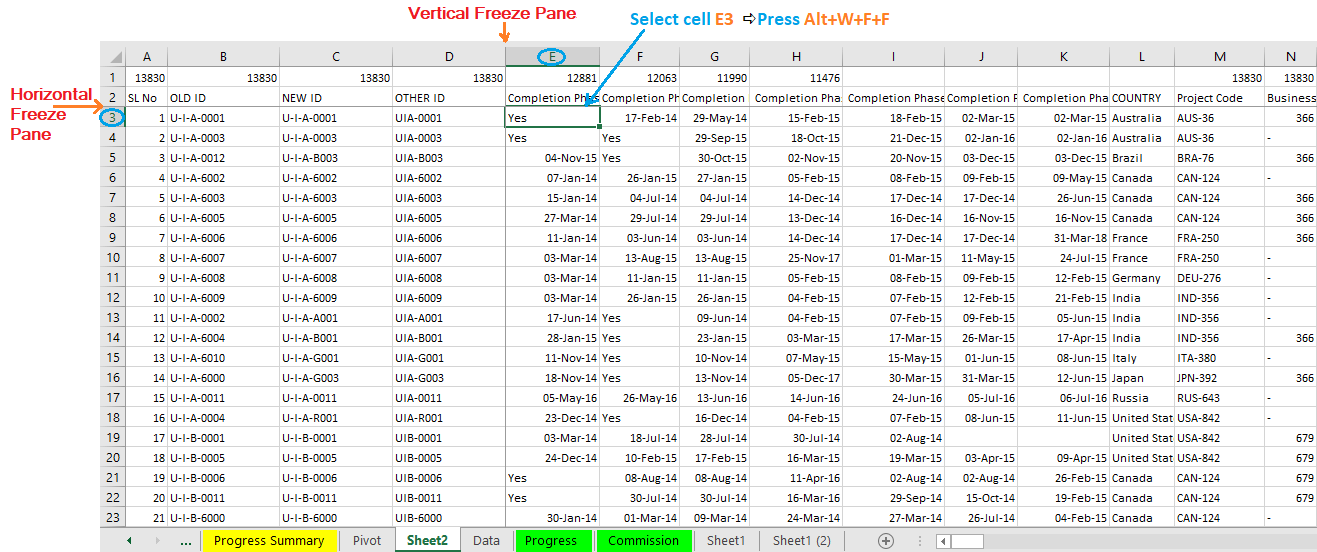
(07) Apply ‘Freeze Panes’ to freeze the ROW & COLUMN
In the next step, we would like to use Freeze Panes to freeze the heading row (Horizontal Freeze Pane) and vertical column (Vertical Freeze Pane) simultaneously.
Thus, we select cell E3 where we want to apply the freeze panes ➪ then press Alt+W+F+F (sequentially press Alt, W, F, F)
As a result, above cell E3 all row(s) and before cell E3 all column(s) to be frozen simultaneously.
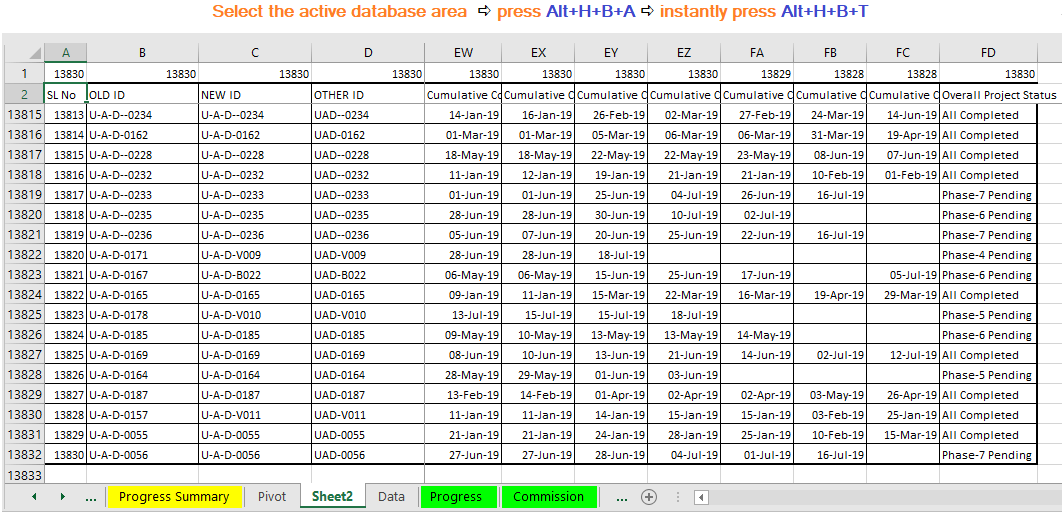
(08) Apply Borders
If we want to add borders to all the active dataset area, select the active area by Ctrl+A ➪ then press Alt+H+B+A (sequentially press Alt, H, B, A) to apply borders over the entire active dataset area ➪ after that press Alt+H+B+T (sequentially press Alt, H, B, T) to apply thick borders outside the main database area.
(09) Use Custom Borders (Optional)
Additionally, we can use custom borders instead of borders.

• Step 1: Apply Custom Color All Border
Select the active dataset area ➪ press Ctrl+1 or Ctrl+Shift+F which will open the ‘Format Cells’ dialog box ➪ go to the ‘Border’ tab ➪ select any color wants to apply the border from the ‘Color’ drop-down box ➪ select line style or keep the default style from the ‘Style’ box ➪ go the ‘Presets’ section, single click on Outline and single click on Inside box ➪ click on OK or press Enter.
• Step 2: Apply Custom Thick Outline Border
To apply the outside thick borders around the active area following the below steps:
Select the active dataset area ➪ to choose a thick line from the ‘Style’ box ➪ clicks on the Outline in the ‘Presets’ section.
As a result, a custom border applied over the selected database area.
(10) Apply the same “Heading Formatting” from the ‘Old Dataset’ to the ‘New Dataset’

If different color combinations in the subject heading are meaningful for working purposes, then we reapply the same formatting from the old database to the new database.

First, we go to the old dataset worksheet, just copy the entire subject heading row by pressing Ctrl+C ➪ then back to the new dataset worksheet ➪ select the first cell in the subject heading (i.e., A2) and press Alt+E+S+T (sequentially press Alt, E, S, T) or Alt+Ctrl+V+T (press Alt+Ctrl+V, then press T) which will select the ‘Formats’ in the ‘Paste Special’ dialog box.
Press Enter or click on OK. Finally, we get the result.

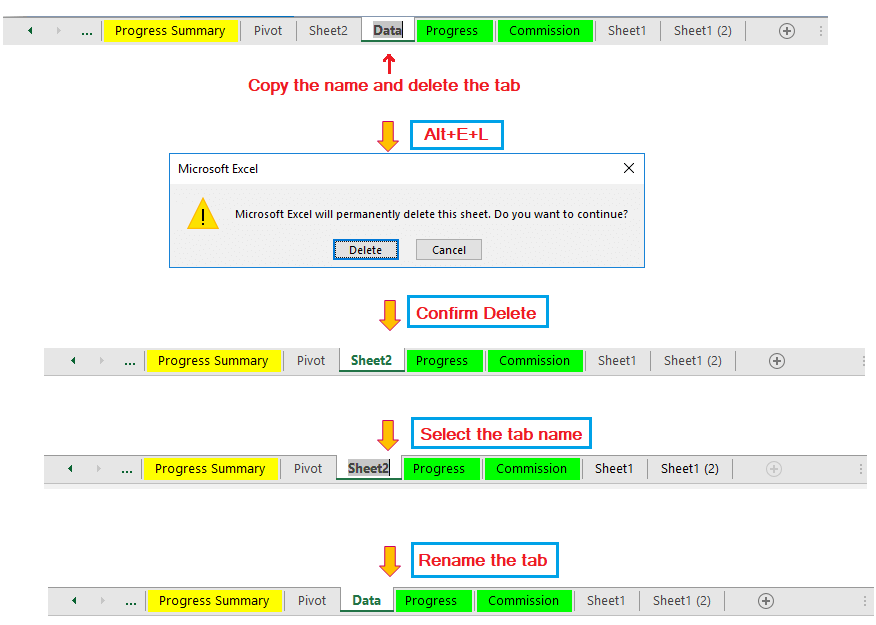
(11) “Rename the New Tab” Similar to “Old Dataset Tab”
• In the next step, copy the old dataset tab name and delete immediately by pressing Alt+E+L (sequentially press Alt, E, L) and confirm delete by pressing Enter or select the ‘Delete’.
• Rename the newly replaced dataset tab either double-click on the tab or press Alt+O+H+R (sequentially press Alt, O, H, R) ➪ paste (Ctrl+V) the copied tab name. Remember that Excel considers only a unique tab name.
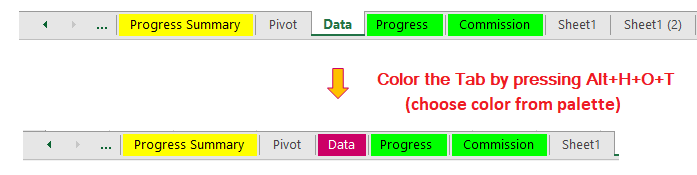
(12) Color the Tab
If there are a number of tabs in a workbook, to identify the main database tab easily from others, we should color the tab.
➢ Benefits: Due to the above process,
01. Remove the Data formatting: As a result, unnecessary data formatting has been removed such as Font Style, Font Size (weigh), Font type (Bold, Italic, Underline) Font Color, Background Color, Borders, strikethrough, underline, etc.
02. Remove the Conditional Formatting: As a result, conditional formatting inside the active database area has been removed.
However, remove formatting creates a minimal impact on the file reduction, but it has been observed that Excel file activity becomes faster than previous.
(02). Step-2: Reduce Excel File Size || Evaluate All The Formulas in Different Worksheet(s) ||
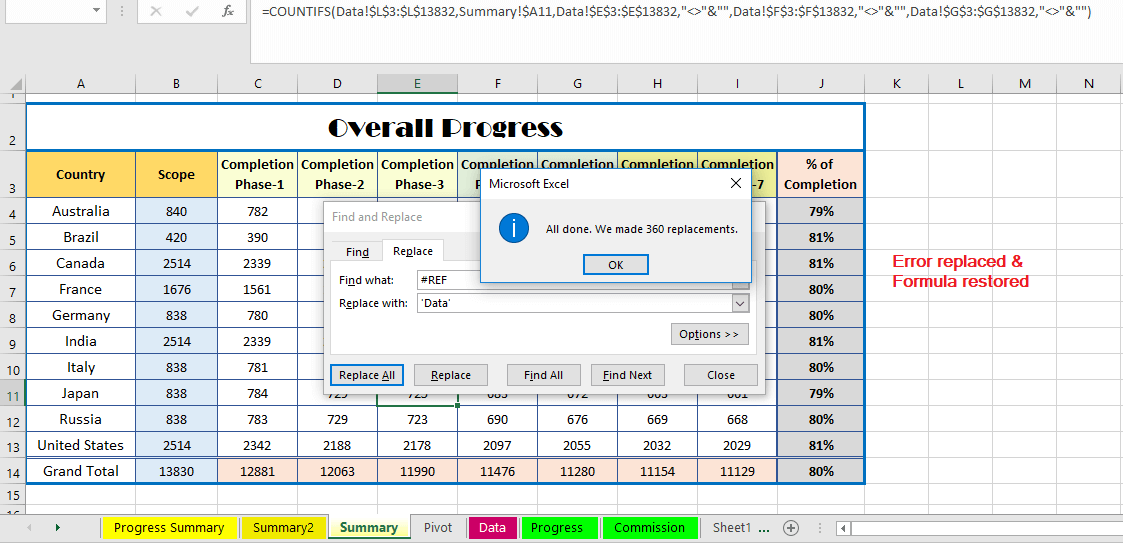
It is a second crucial step. As discussed in the above point, we found that all the linked worksheets showing #REF! Error. We need to evaluate the formulas among the different formulated worksheets. It speeds up Excel file enormously.

Go to one of the existing formulated worksheets ➪ press Ctrl+H to open the ‘Find and Replace’ dialog box ➪ just type #REF in front of the ‘Find what:’ box and exact type the newly replaced data tab name or copied the tab name in front of the ‘Replace with:’ box. But it should be inside the single quotation mark, for example ‘Data’ ➪ then click on ‘Replace All’ button ➪ all replacements have been made and recalculate the formula automatically, which means the formulated worksheet has been automated ➪ now we can follow the same method to all the formulated worksheets one by one.
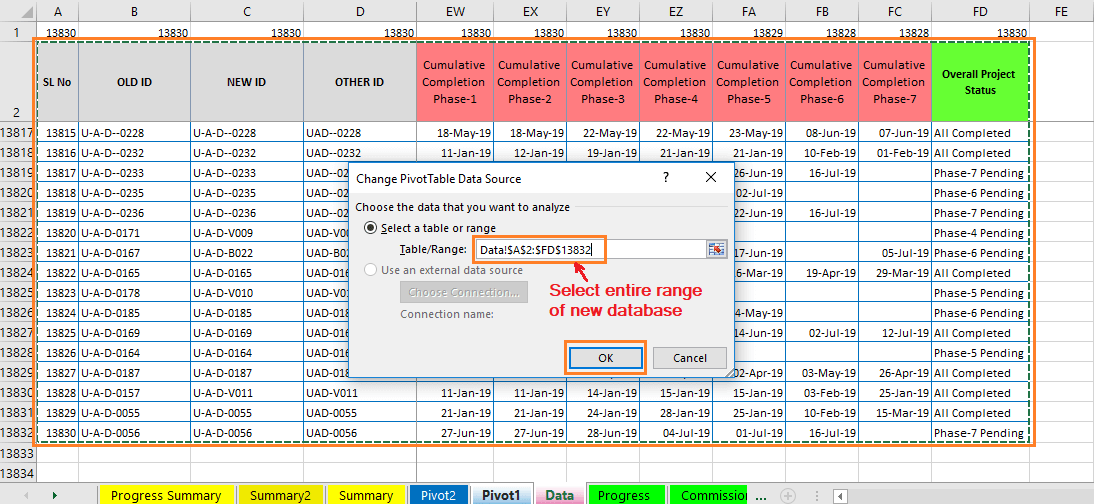
(03). Step-3: Reduce Excel File Size || Change the ‘Old Data Source’ to a ‘New Data Source’ in a Pivot Table ||
It is also an important step. After refreshing, pivot table data could not be updated as it doesn’t connect with a new data source. So, we need to change the Old Data Source to New Data Source in the pivot table.

Click anywhere on the Pivot Table ➪ will activate the ‘PivotTable Tools’ (Analyze Tab and Design Tab) in the Excel ribbon ➪ click on the ‘Change Data Source’ in the Analyze tab ➪ a small window of ‘Change PivotTable Data Source’ opens and select the new database range is located in the ‘Data’ tab. The range to be mentioned in the box located on the right side of the ‘Table/Range:’ ➪ finally, press Enter or click OK. Pivot table perfectly linked with the new database and get updates after refreshing.
(04). Step-4: Reduce Excel File Size || Unused Pivot Table to be ‘Deleted’ Or ‘Converted to Values’ & ‘Remove the Pivot Cache’ ||
When the Pivot Table is created from the main dataset, Excel creates the Pivot Cache automatically. Pivot Cache basically a duplicate copy of the main database.
If there is any unused/unnecessary pivot table in the workbook should be deleted or converted to values. Therefore, the pivot cache is deleted simultaneously. Thus, this step helps to reduce the Excel file size greatly.
(01) Delete the Unused Pivot Table
Click any cell in the pivot table, press Ctrl+A to select the entire Pivot table ➪ press ‘Delete’ on the keyboard to remove the pivot table.
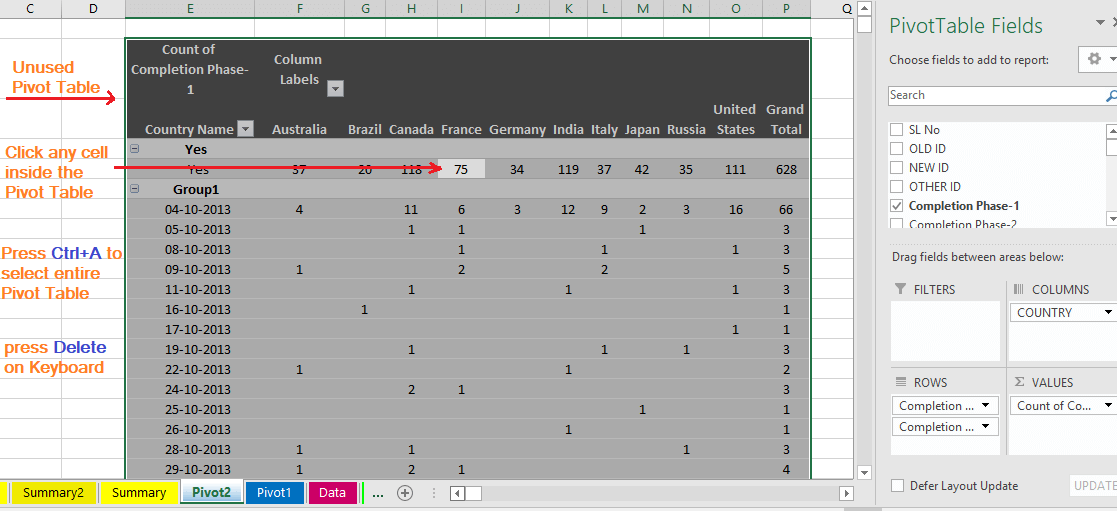
(02) Convert to Values of the Unused Pivot Table
Click any cell in the pivot table, press Ctrl+A to select the entire Pivot table ➪ copy the entire Pivot table by pressing Ctrl+C, and then press Alt+E+S+V (sequentially press Alt, E, S, V) or Alt+Ctrl+V+V (sequentially press Alt+Ctrl+V, V) to select the option ‘Values’ in the ‘Paste Special’ dialog box ➪ press Enter or click OK.
Alternatively, click on any cell in the pivot table, press Ctrl+A to select the entire Pivot table ➪ copy the entire Pivot table by pressing Ctrl+C and then press Alt+E+S+U (sequentially press Alt, E, S, U) or Alt+Ctrl+V+U (sequentially press Alt+Ctrl+V, U) to select the option ‘Values and number formats’ in the ‘Paste Special’ dialog box ➪ press Enter or click OK.
(03) Remove the Pivot Cache
If the Pivot Table is mandated to keep in the workbook, in that case, we should delete the Pivot cache to reduce the file size.

Click anywhere, any cell in the pivot table ➪ Choose PivotTable Tools in the ribbon and click on ‘Analyze’ ➪ In PivotTable area, click ‘Options’ ➪ Go to the ‘Data’ tab of ‘PivotTable Options’ window ➪ unchecked the ‘Save source data with file’ and checked the ‘Refresh data when opening the file’ ➪ Press Enter or click on OK.
Note: We should check the ‘Refresh data when opening the file’ option that ensures that the Pivot Table is refreshed while open the workbook and the Pivot Cache is automatically generated. Otherwise, we have to refresh the Pivot table manually to generate the Pivot Cache.

(05). Step-5: Reduce Excel File Size || Remove ‘Unnecessary Formulas’ From the Worksheet ||
(01) Remove Unwanted Formulas from the Main Dataset
If there are unnecessary/unwanted formulas in the main dataset, we should convert them into values. It has no effect to reduce file size directly, but speed it up the excel file extremely. We can do it in 2 steps:
A. Find & Select All the Formulas in the Main Dataset
We can do it in 3 ways:

➢ Method 1: Using the Ribbon (Home ➪ Find & Select ➪ Go To Special)
Select the entire database by Ctrl+A ➪ Go to ‘Home’ ➪ click on ‘Find & Select’ dropdown under ‘Editing’ Section ➪ click on ‘Go To Special’ ➪ then press Alt+F or select the ‘Formulas’ and keep all the checkboxes checked ➪ finally, press Enter or click on OK.
➢ Method 2: Using Excel Shortcut (Ctrl+G)
Select the entire database by Ctrl+A ➪ then press Ctrl+G to open the ‘Go To’ dialog box ➪ press Alt+S or click on ‘Special’ ➪ then press Alt+F or select the ‘Formulas’ and keep all the checkboxes checked ➪ finally, press Enter or click on OK.

➢ Method 3: Using Excel Shortcut (F5)
Select the entire database by Ctrl+A ➪ press F5 to open the ‘Go To’ dialog box ➪ press Alt+S or click on ‘Special’ ➪ then press Alt+F or select the ‘Formulas’ and keep all the checkboxes checked ➪ finally, press Enter or click on OK.
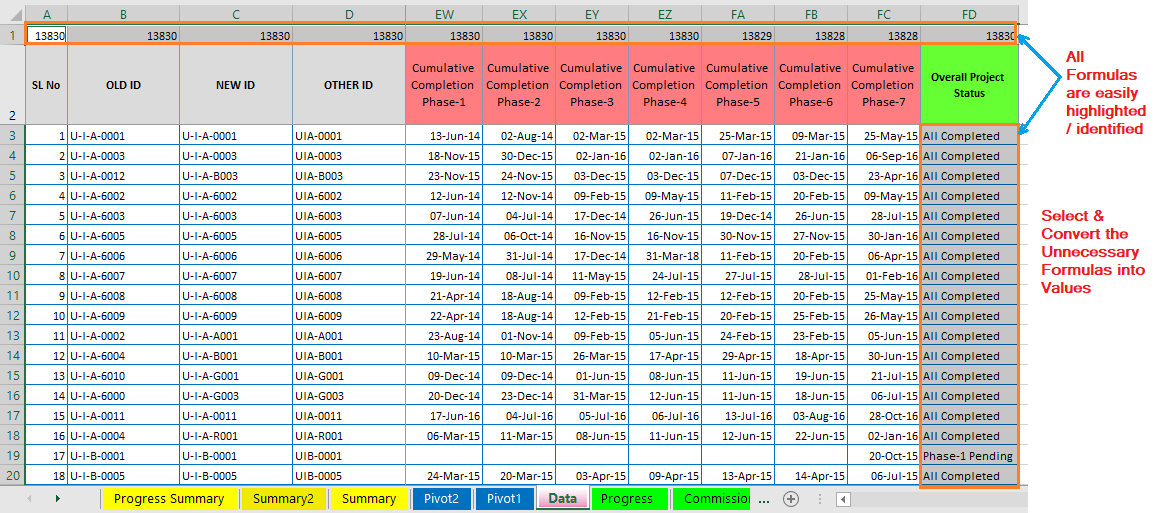
B. Convert Unnecessary Formulas to Values
Columns with the formulas are getting highlighted and identified by the above process, select unnecessary columns among them and convert them to values. Similarly, we can do it in 3 ways:
➢ Method 1: Using Excel Shortcut (Alt+E+S+V / Alt+Ctrl+V+V)
After the selection of cells with formulas, press Ctrl+C to copy all of them ➪ then press Alt+E+S+V (sequentially press Alt, E, S, V) or Alt+Ctrl+V+V (sequentially press Alt+Ctrl+V, V) will promote opening the ‘Paste Special’ dialog box and select the option ‘Values’ simultaneously ➪ press Enter or click OK.
➢ Method 2: Using Excel Shortcut (Alt+E+S+U / Alt+Ctrl+V+U)
Alternatively, Copy (Ctrl+C) the selected cells with formulas ➪ then using the Excel Shortcut Alt+E+S+U (sequentially press Alt, E, S, U) or Alt+Ctrl+V+U (pressAlt+Ctrl+V, then press U) to select the option ‘Values and number formats’ in the ‘Paste Special’ dialog box ➪ press Enter or click on OK.
➢ Method 3: Right Click on Mouse
Alternatively, Copy (Ctrl+C) the selected cells with formulas ➪ Right-click on the mouse anywhere in the selection ➪ Select ‘Values’.
(02) Remove Unnecessary Formulas Outside the Main Dataset
For daily working purposes, we allow some columns outside the main database area for the formulation, basically using VLOOKUP, HLOOKUP for capturing data from other sources. We should remove them regularly.
• Remove column(s) with formula by Ctrl+minus (-).
• Remove all cell contents by pressing the ‘Delete‘ key but note that in that case cell formatting remains in the area.
(06). Step-6: Reduce Excel File Size || Remove ‘Unnecessary Worksheets/Tabs’ ||
If there are unused/unnecessary worksheet(s) or tab(s) in the workbook, simply delete them. It helps to reduce excel file size immensely.
➢ Remove Contiguous Worksheets/Tabs
If the worksheets or tabs are contiguous, then select the first tab to want to delete and hold the ‘Shift’ key and click on the last tab want to delete. This will make a group of contiguous worksheets and press Alt+E+L (sequentially press Alt, E, L) then press Enter or click ‘Delete’. All contiguous worksheets/tabs will be deleted.
➢ Remove Non-Contiguous Worksheets/Tabs
If the worksheets or tabs are non-contiguous, then select the tabs by holding the ‘Ctrl’ Key. Similarly, this will make a group of non-contiguous worksheets and press Alt+E+L (sequentially press Alt, E, L) then press Enter or click on ‘Delete’. All non-contiguous worksheets/tabs will be deleted.

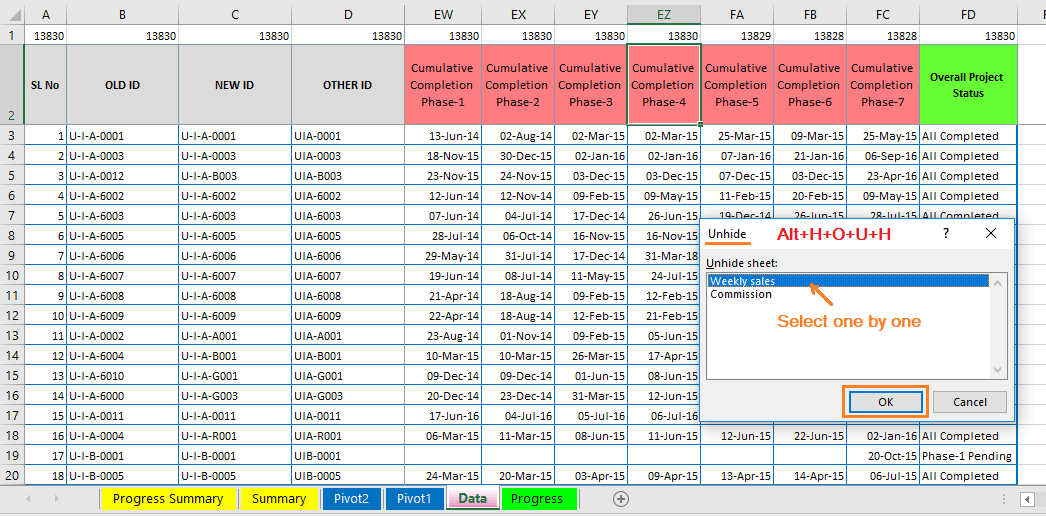
(07). Step-7: Reduce Excel File Size || Remove ‘Hidden Worksheets/Tabs’ ||
Another possibility we should check further, are there any hidden worksheets in the workbook? After deleting unnecessary or unused hidden worksheet(s), it reduces excel file size a lot.

➢ Step 1: Unhide the Worksheet(s)
• Just right-click on any open worksheet tab and click Unhide. If any unhide worksheet is there, this option is highlighted.
• Alternatively, we can use Excel shortcut Alt+H+O+U+H (sequentially press Alt, H, O, U, H) ➪ a new ‘Unhide’ window opens.
Note that we can unhide only one worksheet at a time. If multiple worksheets are hidden there, so in that case, repeat the unhide process multiple times to restore them.
➢ Step 2: Delete the Worksheet(s)
• While all the worksheets are visible, group them by pressing the ‘Ctrl’ key. Press Alt+E+L (sequentially press Alt, E, L) which will open a Microsoft Excel warning window before deleting worksheet(s), and then press Enter or click on ‘Delete’.
• Alternatively, after grouping by ‘Ctrl’ key, right-click anywhere in the selection and select ‘Delete’.
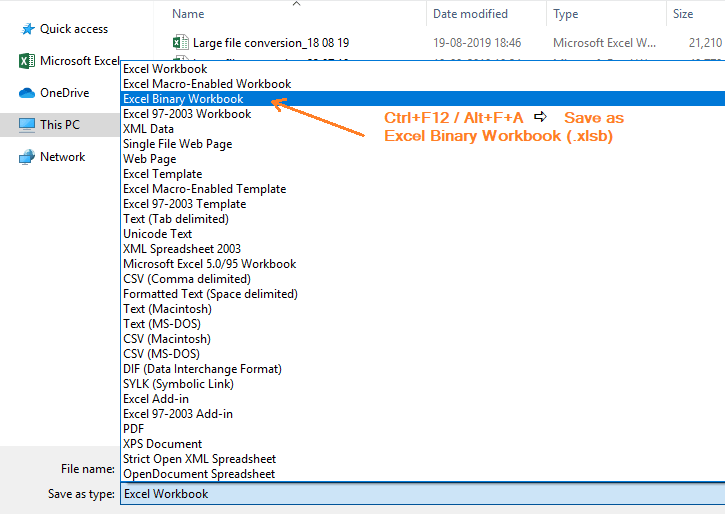
(08). Step-8: Reduce Excel File Size || Convert Excel file (XLSX) to Binary Format (XLSB) ||
The XLSX is an open XML spreadsheet file format. Before closing the file/workbook, we should change the Excel file extension to XLSB format. Now a question arises in the user’s mind: “what is the excel binary workbook?” XLSB is an Excel Binary Workbook.
Therefore, the excel file reduces in size up to 50% smaller.
Additionally, accessibility (writing, cell movement, filtering) of XLXB file noticeably faster, even as much as 50%.
We can do this in 3 ways:
➢ Method 1: Using Excel Shortcut (Ctrl+F12 or F12)
Press Ctrl+F12 or only press the F12 key which allows us to open the ‘Save As’ dialog box ➪ click on the drop-down list of ‘Save as type:’ located at the right-side ➪ select the ‘Excel Binary Workbook (*.xlsb)’ ➪ either press Enter or click on ‘Save’.
➢ Method 2: Using Excel Shortcut (Alt+F+A)
Alternatively, Press Alt+F+A to open the ‘Save As’ dialog box ➪ Click on ‘Browse’ to choose the folder where to save the file ➪ click on the drop-down list of ‘Save as type:’ located at the right side under the ‘Save As’ dialog box ➪ select the ‘Excel Binary Workbook (*.xlsb)’ ➪ either press Enter or click on ‘Save’.
➢ Method 3: Using the Ribbon (File ➪ Save As)
Go to the ‘File’ tab ➪ click on the ‘Save As’ option ➪ Click on ‘Browse’ ➪ click on the drop-down list of ‘Save as type:’ located at the right side under the ‘Save As’ dialog box ➪ select the ‘Excel Binary Workbook (*.xlsb)’ ➪ either press Enter or click on ‘Save’.
(09). Step-9: Reduce Excel File Size || Compress Images ||
This is an optional step to reduce excel file size. If there are many images, we need to optimize or smash them. Then the question arises in the user’s mind about how to reduce excel file size with pictures?


➢ Conclusion
After following the above processes, Excel file size reduces a lot, speeding up performance, evaluating all the formulas in different worksheets, the workbook is automated and file performance improves extremely.


Leave a Comment