Extract and Sort by Last Name using Flash Fill
Working with names is often a straightforward task as sorting the names is quite easy in Excel.
With the Excel sort feature, it’s a matter of few clicks to sort the entire name dataset with full names. As Excel uses the first character of each name, you can sort the names in ascending or descending order.
However, it is anything but simple if we want to sort the data by the last name in Excel.
Although it looks complex and not entirely simple as the case of full names, it’s doable quite easily if one knows the right steps. And there are several methods to choose from.
But whatever method we choose, we will first have to extract the last name into a separate column. Once the last name is in a separate column, we can sort the names alphabetically in the order we desire.
In this tutorial guide, we will discuss several methods to sort a column with names by the last name.
Starting with the easiest and lastly discussing the advanced tool available to dynamically sort the names data based on the last name in Excel.
Extract and Sort by Last Name using Flash Fill
The easiest method to extract first and last names from the list of the full names is to use Excel flash fill tool.
For Flash Fill to work, you have to repeat the desired results a couple of times. Once Excel recognizes the pattern you are following, it will suggest the rest of the range automatically. And if you agree to the suggestion, you can choose to fill the range.
Following are the steps to extract and sort by the last name using Excel Flash Fill:
1: Name two columns as “First name” and “Last name” each.
2: For the first name, manually type the first and the last name in the respective column.
3: Including the name you just type, select the cells down to the entire range, and hit CTRL+E on the keyboard.
4: Repeat step 3 for the last name column as well.
Following animation shows you how to do it quickly!

Another way to deploy Flash Fill is to simply drag the fill handle down and then select Flash Fill from the option.

Now that we have extracted the last name, we can sort the data using the method discussed here.
Extract and Sort by Last Name using Text to Columns
Excel Text to Columns, a short for convert text to columns, is another tool that can help us easily separate first and last names in a cell.
Text to columns uses identifiers called delimiters to split the content of the cells. In Excel user can specify the delimiter e.g. space, comma, full stop, dash, or any other character.
Once a delimiter that best represents the data is selected, In the preview pane, an Excel user can choose to either import all the columns or skip certain columns to import only selected columns.
Using the same example as above, the following steps will show how to use Text to Column to sort by the last name:
- Select the names with the mouse or by using directional keys while pressing down SHIFT key on the keyboard. Make sure to EXCLUDE headers while selecting the names.
- Go to Data tab > click Text to Columns in the “Data Tools” group. A pop-up with three steps wizard will appear.
- Make sure “Delimited” button is selected and click “Next” button.
- For step 2 of the wizard, check the “space” option and uncheck any other option under “Delimiters” list. At the bottom of the pop-up, Excel will show a preview of how data will be split. Click “Next”.
- In Step 3, change the cell address to the cell where you want the split data. In my case, it is cell B2. Click Finish.
The following animation shows you all the steps carried out to get the First and Last name in two separate columns using “Text to Columns” tool:

Now the only thing that remains is sorting by the last name. Head over here to learn the sorting by the last name technique.
Find and Replace [CTRL+H]
By now it is clear that to sort the list of names by the last name, we first need to extract the last name into a separate column.
As we know, full name consists of three parts; first name, space, last name.
Excel’s Find and Replace tool can help us extract the Last Name from the Full Name by simply replacing everything before the last name within the full name.
Here are the steps to extract and sort by the last name using Find and Replace in Excel:
- Select the names > hit CTRL+C on the keyboard to copy.
- Move to the cell where you want the list of Last Names to appear and hit CTRL+V.
- With pasted names still selected hit CTRL+H. A pop-up will appear with replace tab active.
- In the “Find what” input field put an asterisk followed by the space.
- Leave the “Replace with” input field blank.
- Click “Replace All”
This will instantly remove the first two parts of the full name i.e. first name and space. And you are left with only the last name for each name.
Here is the animation that shows all the steps to use the Find and Replace tool to sort names data by the last name:

Now all that remains is sort using the last name which you can do by following these steps.
Extract the Last Name using Excel formula
Although the above methods are simple and effective, they have two significant limitations:
- Results are static. If we add new names to the list, results won’t update dynamically for us. And we will have to perform the whole process again for the new entries.
- If we have a middle name, the above methods can render unreliable results.
To solve these issues, we can use Excel formulas to extract and sort the data by the last names.
Again we are using the same example as above but this time we have few names with a middle name as well.
Following is the formula to extract the last names from names:
=RIGHT(A2,LEN(A2)-FIND("#",SUBSTITUTE(A2," ","#",LEN(A2)-LEN(SUBSTITUTE(A2," ","")))))Paste the above formula in the cell where you want the list to start (B2 in my case) and drag the fill handle down till the last name. Or simply double-click the fill handle.

Now that we have the last name for each name, we can sort the data using the sort tool in Excel as shown here.
As you can see that formula easily handled the names even with middle names. An additional benefit is that if I add another name to the last, I simply have to drag the fill handle further down to get the results instantly.

Sort the data by the last name in Excel
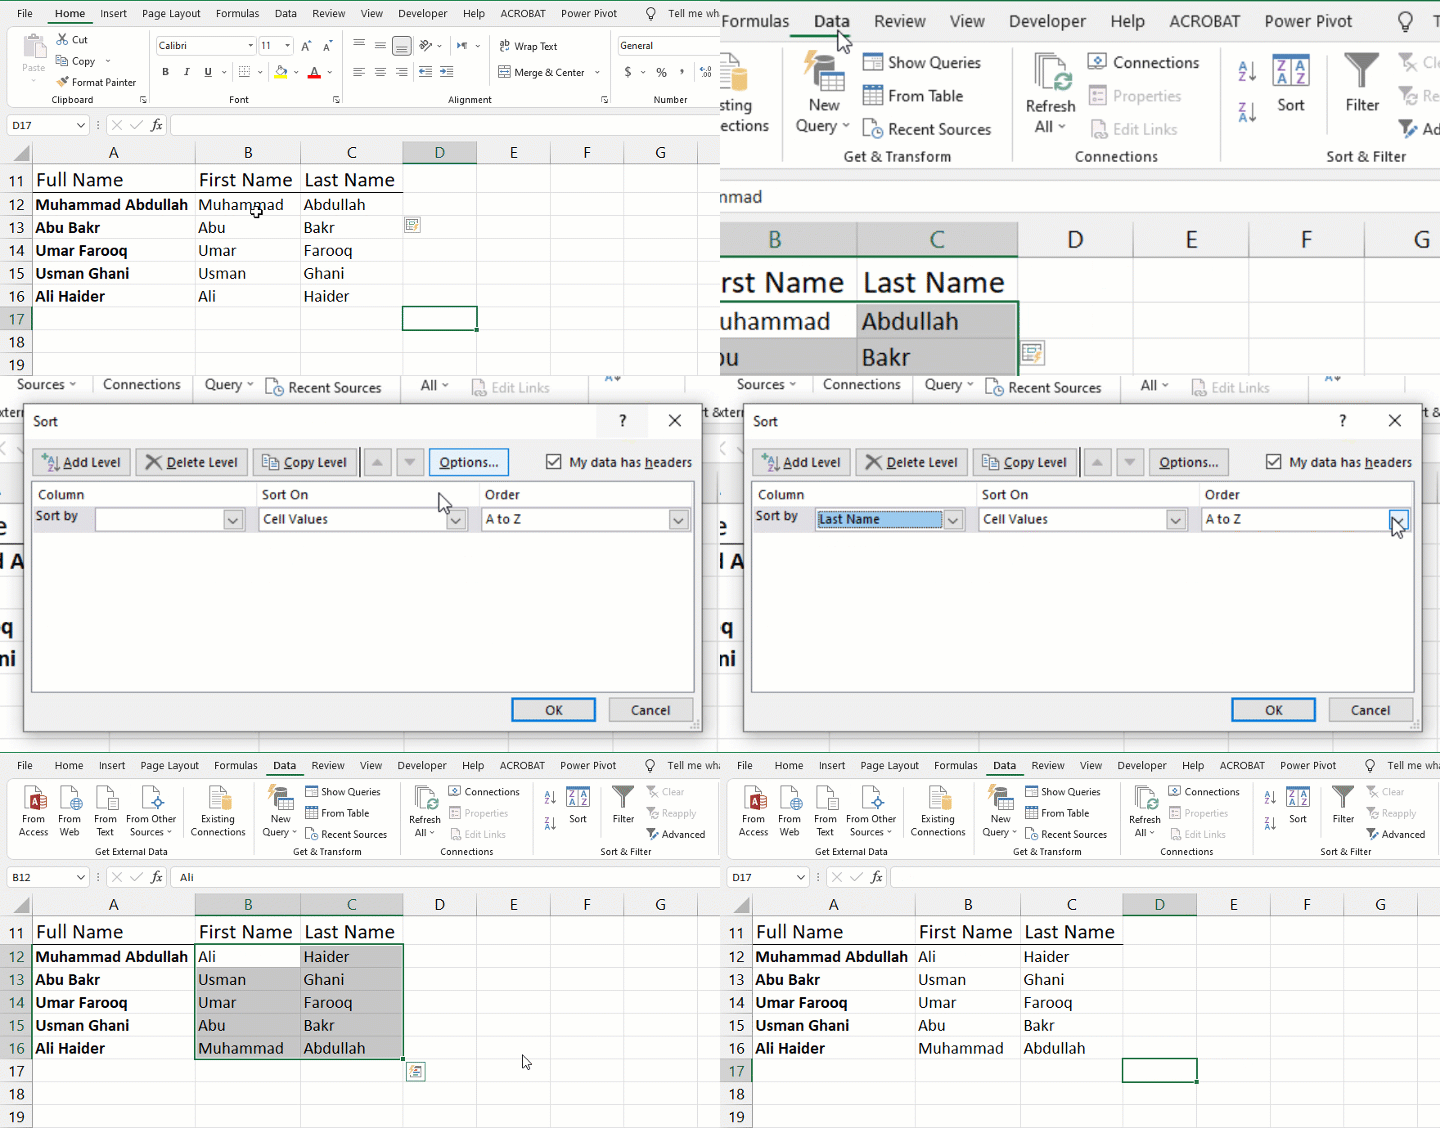
In all of the above methods i.e. Flash Fill, Text to Columns, Find and Replace and Formula method, we have only extracted the last name in a separate column. To sort the data by the last name we need to take few additional steps as following.
Extracted both the First and the Last Name
And now we can easily sort both the columns by the last name with the following steps:
- Simply select both First Name and Last Name columns > go to data tab > click sort button in sort and filter group > a popup will appear.
2. From “Sort by” drop-down > select “Last Name” and if you want ascending order leave the order drop down as it is or if you like to sort names in descending order then select “Z to A”.

Extracted only the Last Name
And if you have extracted only the last name in a separate column, the steps are absolutely the same. The only difference is that now we will select Full Names alongside Last Names to sort as shown below:

Power Query – Dynamically Extract & Sort by the last name
Saving the best for the last, Excel Power Query is built for such kinds of tasks.
With Power Query, we can automate the process of extracting and sorting the data by the last name in a few simple steps.
And the best thing is that if our data changes, we simply need to refresh the query to get the latest results.
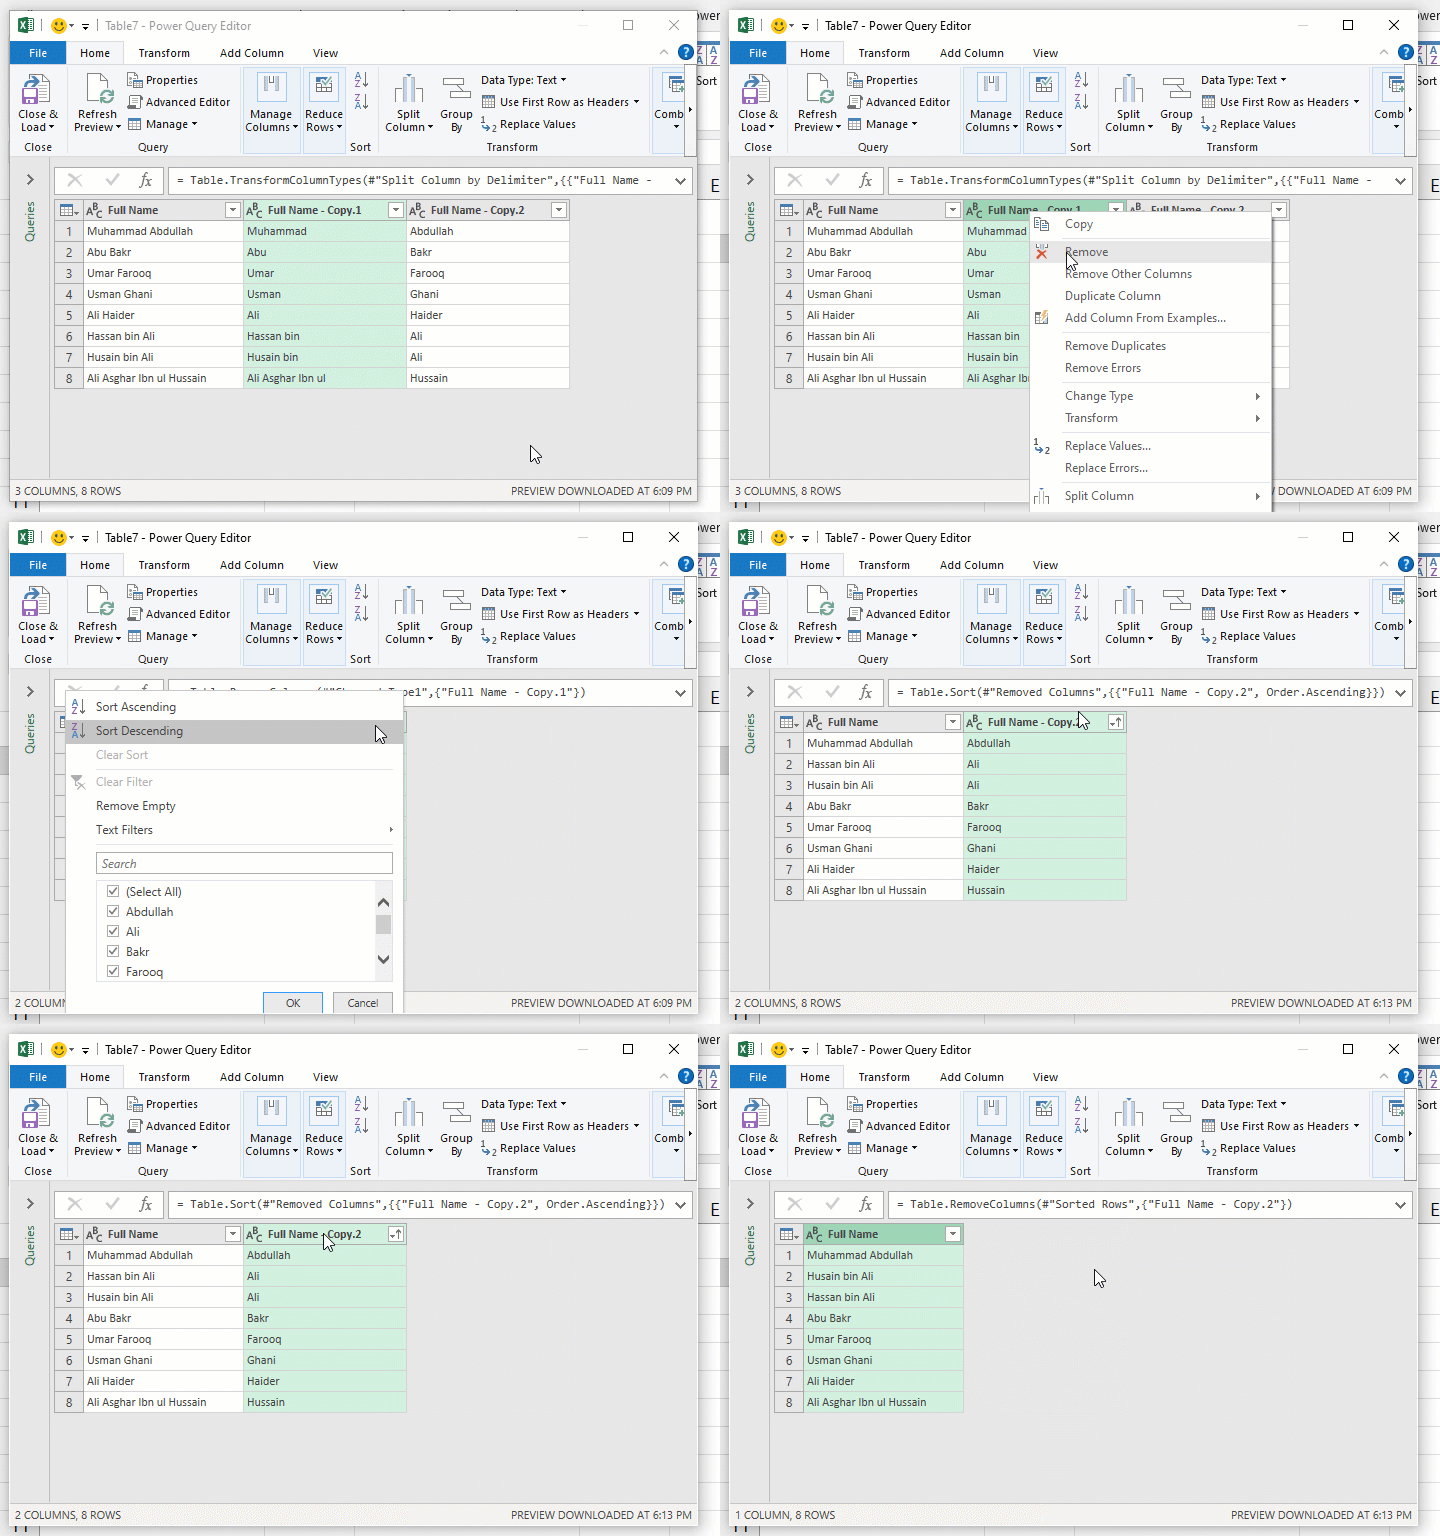
Below are the steps to extract and sort the data by the last name using Excel Power Query:
- Select the range containing the full names and hit CTRL+T on the keyboard to convert it to Excel table range. Make sure “My table has headers” is checked. Press OK.

- Go to data tab > Under “Get and Transform” group click From Table button. This will invoke the Power Query module.
- With mouse, right-click on the header > click Duplicate column.

- With duplicate column selected > in “Transform” group under home tab click Split Columns drop-down button > click By Delimiter.
- Select Space as the delimiter. Under “Split at” options, click Right-most delimiter. This will give two additional columns. The last column contains the last names.

- Remove the middle column by simply right-clicking the header and pressing Remove.
- Click the downward-facing arrow at the right corner of the second column and select the order in which you want to sort the data. For example; ascending.
Remember, we are applying the sort on the last name column which will automatically sort the full name column by the last name. I selected ascending. - Right-click on the header of the second column > click Remove to delete the column.
Don’t worry. Your data will remain sorted. We are only getting rid of the redundant column meant for sorting purposes only.
- Under Home tab > click Close and Load drop-down button > click Close and Load To…
- A pop-up box will appear with options letting you choose if you want to show the sorted list of full names on a new worksheet or at a certain cell address on the same worksheet. I went ahead with Existing worksheet and C1 as the cell address to show the sorted list.

And here you have the dynamic list of Full names that is sorted by the last name. And if we add new names to the table, we simply need to refresh the query to fetch the latest results. As shown below:

This concludes our guide with five methods on how to sort the data by the last name.
All the methods discussed have their uses. If data is simple and you need a quick turnaround, Find and Replace is the one to go with. But if you have complex data then I prefer formula and power query methods.
Hope this tutorial has added to your Excel knowledge.


Leave a Comment