
How to Record a Macro in Excel – A Step by Step Guide
How to Record a Macro in Excel – A Step by Step Guide
What is a Macro?
If you’re a newbie to VBA, let me first tell you what a macro is – after all, I will keep using this term in the entire tutorial.
A macro is a code written in VBA (Visual Basic for Applications) that allows you to run a chunk of code whenever it is executed.
Often, you will find people (including myself) refer to a VBA code as a macro – whether it’s generated by using a macro recorder or has been written manually.
When you record a macro, Excel closely watches the steps you’re taking and notes it down in a language that it understands – which is VBA.
And since Excel is a really good note taker, it creates a very detailed code (as we will see later in this tutorial).
Now, when you stop the recording, save the macro, and run it, Excel simply goes back to the VBA code it generated and follows the exact same steps.
This means that even if you know nothing about VBA, you can automate some tasks just by letting Excel record your steps once and then reuse these later.
Now let’s dive in and see how to record a macro in Excel.
Getting the Developer Tab in the Ribbon
The first step to record a macro is to get the Developer tab in the ribbon.
If you can already see the developer tab in the ribbon, go to the next section, else follow the below steps:
- Right-click on any of the existing tabs in the ribbon and click on ‘Customize the Ribbon’ option. It will open the Excel Options dialogue box.

- In the Excel Options dialogue box, you will have the Customize the Ribbon options. On the right, within the Main Tabs pane, check the Developer option.
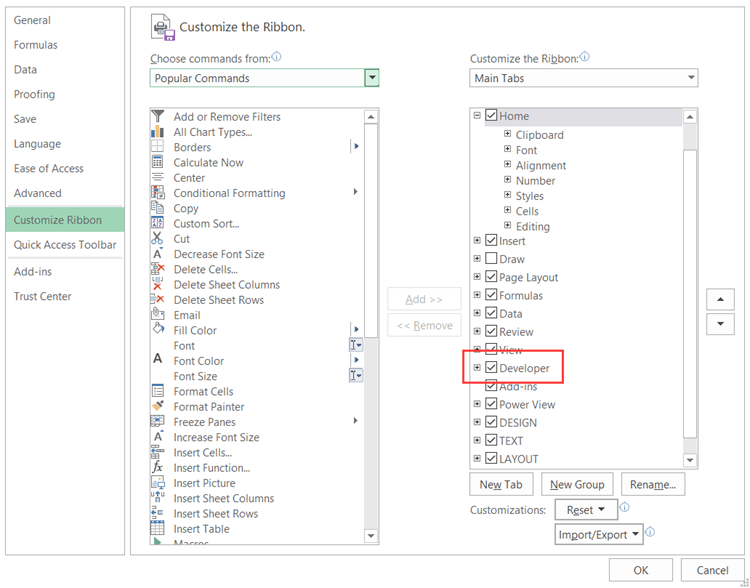
- Click OK.
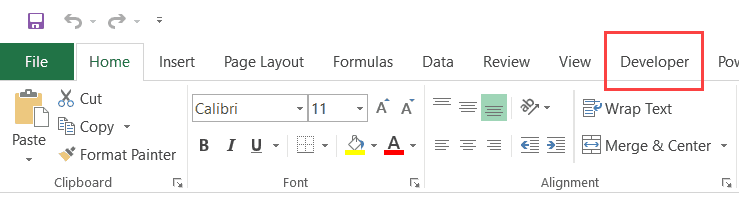
The above steps would make the Developer tab available in the ribbon area.
Recording a Macro in Excel
Now that we have everything in place, let’s learn how to record a macro in Excel.
Let’s record a very simple macro – one that selects a cell and enters the text ‘Excel’ in it. I am using the text ‘Excel’ while recording this macro, but feel free to enter your name or any other text that you like.
Here are the steps to record this macro:
- Click the Developer tab.
- In the Code group, click on the Macro button. This will open the ‘Record Macro’ dialog box.

- In the Record Macro dialog box, enter a name for your macro. I am using the name EnterText. There are some naming conditions that you need to follow when naming a macro. For example, you can not use spaces in between. I usually prefer to keep my macro names as a single word, with different parts with a capitalized first alphabet. You can also use underscore to separate two words – such as Enter_Text.

- (Optional Step) You can assign a keyboard shortcut if you want. In this case, we will use the shortcut Control + Shift + N. Remember that the shortcut you assign here would override any existing shorcuts in your workbook. For example, if you assign the shortcut Control + S, you will not be able to use this for saving the workbook (instead, everytime you use it, it will execute the macro).

- In the ‘Store macro in’ option, make sure ‘This Workbook’ is selected. This step ensures that the macro is a part of the workbook. It will be there when you save it and reopen again, or even if you share it with someone.
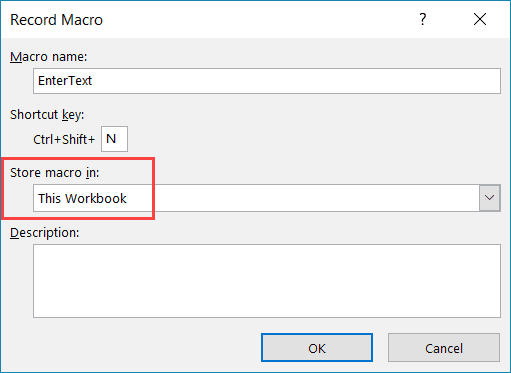
- (Optional Step) Enter a description. I usually don’t do this, but if you’re extremely organized, you may want to add what the macro is about.
- Click OK. As soon as you click OK, it starts to record your actions in Excel. You can see the ‘Stop recording’ button in the Developer tab, which indicates that the macro recording is in progress.
- Select cell A2.
- Enter the text Excel (or you can use your name).
- Hit the Enter key. This will select cell A3.
- Click on the Stop Recording button the Developer tab.

Congratulations!
You have just recorded your first macro in Excel. You’re no longer a macro virgin.
While the macro doesn’t do anything useful, it’ll serve its purpose in explaining how a macro recorder works in Excel.
Now let’s go ahead and test this macro.
Follow the steps below to test the macro:
- Delete the text in cell A2. This is to test if the macro inserts the text in cell A2 or not.
- Select any cell – other than A2. This is to test whether the macro selects cell A2 or not.
- Click the Developer tab.
- In the Code group, click the Macros button.
- In the Macro dialog box, click on the macro Name – EnterText.
- Click the Run button.
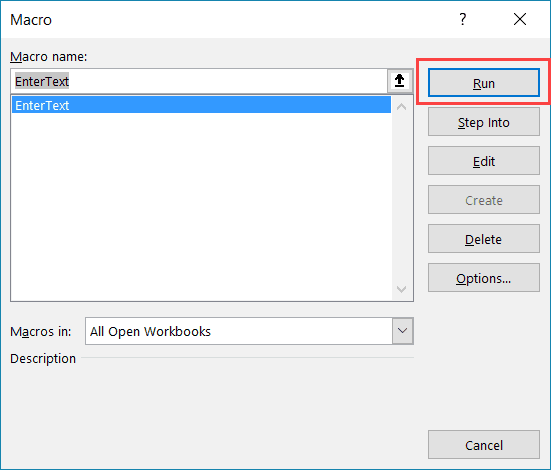
You will notice that as soon as you click the Run button, the text ‘Excel’ gets inserted into cell A2 and cell A3 gets selected.
Now, this may all happen in a split second, but in reality, the macro – just like an obedient elf – followed the exact steps you showed it while recording the macro.
So the macro first selects the cell A2, then enters the text Excel in it, and then selects the cell A3.
What Recording a Macro does in the Backend
Now let’s go to the Excel backend – the VB Editor – and see what recording a macro really does.
Here are the steps to open the VB Editor in Excel:
- Click the Developer tab.
- In the Code group, click the Visual Basic button.

Or you can use the keyboard shortcut – ALT + F11 (hold the ALT key and press F11), instead of the above two steps. This shortcut also opens the same VB Editor.
Now if you’re seeing the VB Editor for the first time, don’t be overwhelmed.
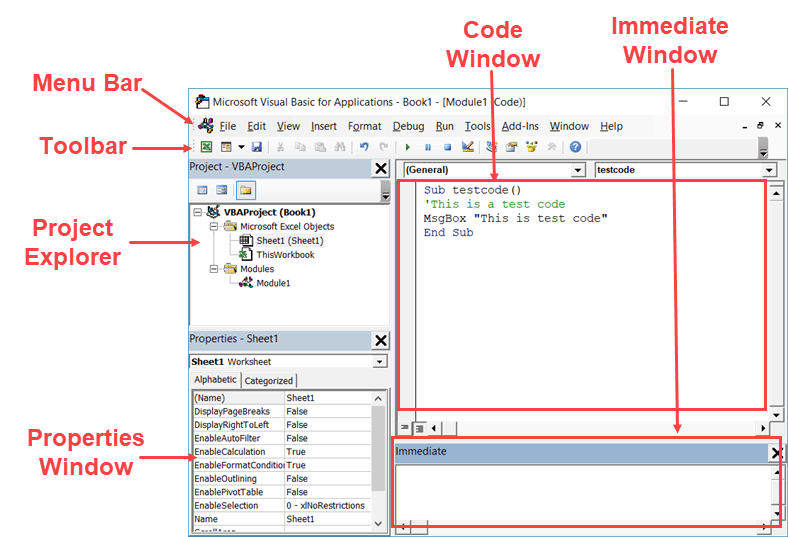
Let me quickly make you familiar with the VB Editor anatomy.
- Menu Bar: This is where you have all the options of VB Editor. Consider this as the ribbon of VBA. It contains commands that you can use while working with the VB Editor.
- Toolbar – This is like the Quick Access Toolbar of the VB editor. It comes with some useful options, and you can add more options to it. Its benefit is that an option in the toolbar is just a click away.
- Project Explorer Window – This is where Excel lists all the workbooks and all the objects in each workbook. For example, if we have a workbook with 3 worksheets, it would show up in the Project Explorer. There are some additional objects here such as modules, user forms, and class modules.
- Code Window – This is where the VBA code is recorded or written. There is a code window for each object listed in the Project explorer – such as worksheets, workbooks, modules, etc. We will see later in this tutorial that the recorded macro goes into the code window of a module.
- Properties Window – You can see the properties of each object in this window. I often use this window to name objects or change the hidden properties. You may not see this window when you open the VB editor. To show this, click the view tab and select Properties Window.
- Immediate Window – I often use the immediate window while writing code. It’s useful when you want to test some statements or while debugging. It may not be visible by default and you can make it appear by clicking the View tab and selecting the Immediate Window option.
- When we recorded the macro – EnterText, the following things happened in the VB Editor:
- A new module was inserted.
- A macro was recorded with the name that we specified – EnterText
- The code was written in the code window of the module.
So if you double-click on the module (Module 1 in this case), a code window as shown below would appear.
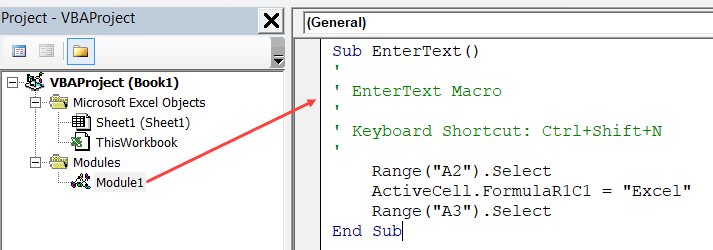
Here is the code that the macro recorder and given us:
Sub EnterText()
'
' EnterText Macro
'
' Keyboard Shortcut: Ctrl+Shift+N
'
Range("A2").Select
ActiveCell.FormulaR1C1 = "Excel"
Range("A3").Select
End Sub
In VBA, any line that follows the ‘ (apostrophe sign) is not executed. It’s a comment that’s placed for information purpose only. If you remove the first five lines of this code, the macro will still work as expected.
Now let me quickly cover what each line of code does:
The code starts with Sub followed by the name of the macro and empty parenthesis. Sub is short for Subroutine. Every subroutine (also called Procedure) in VBA starts with Sub and ends with End Sub.
- Range(“A2”).Select – This line selects the cell A2.
- ActiveCell.FormulaR1C1 = “Excel” – this line enters the text Excel in the active cell. Since we selected A2 as the first step, it becomes our active cell.
- Range(“A3”).Select – This selects cell A3. This happens as we hit the Enter key after entering the text, result of which was to select cell A3.
I hope by now you have some basic understanding of how to record a macro in Excel.
Keep in mind that the code written by a macro recorder is by no means an efficient code.
Macro recorder sometimes adds a lot of fluff to the code which is not necessary at times. But this does not mean that it’s not useful. For someone learning VBA, a macro recorder can be a great way to analyze how things work in VBA.
Absolute Vs Relative Macro Recording
You already know about absolute and relative references in Excel.. right?
If you don’t – read this tutorial on references first.
Read it? Let’s move on.
Now let me tell you how to record a macro in relative references mode:
- Select cell A1.
- Click the Developer tab.
- In the Code group, click on the ‘Use Relative References’ button. It will turn green, indicating that it’s turned on.

- Click the Record Macro button.

- In the Record Macro dialog box, enter a name for your macro. I am using the name EnterTextRelRef.

- In the Store macro in option, make sure ‘This Workbook’ is selected.
- Click OK.
- Select cell A2.
- Enter the text Excel (or you can enter your name).
- Hit the Enter key. This will take the cursor to the cell A3.
- Click on the Stop Recording button the Developer tab.
This would record the macro in the relative reference mode.
Now do this.
- Select any cell (other than A1).
- Click the Developer tab.
- In the Code group, click the Macros button.
- In the Macro dialog box, click on the macro Name – EnterTextRelRef.
- Click the Run button.
What happens? Did the cursor go back to cell A3.
It wouldn’t – because you have recorded the macro in the relative reference mode. So the cursor would move relative to the active cell. For example, if you do this when cell K3 is selected, it will enter the text Excel is cell K4 and end up selecting cell K5.
Here is the code that gets recorded in the backend (VB Editor module code window):
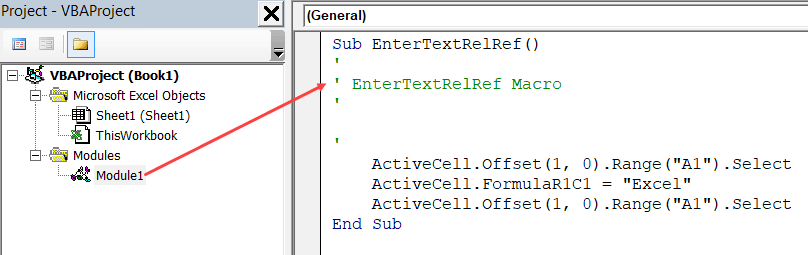
Sub EnterTextRelRef()
'
' EnterTextRelRef Macro
'

'
ActiveCell.Offset(1, 0).Range("A1").Select
ActiveCell.FormulaR1C1 = "Excel"
ActiveCell.Offset(1, 0).Range("A1").Select
End Sub
Note that this entire code doesn’t refer to the cells K3 or K4 anywhere. Instead, it uses the Activecell to refer to the selected cell and Offset to move relative to the active cell.
Don’t worry about Range(“A1”) part that the code has. It is one of those unnecessary codes that the macro recorder adds that serves no purpose and can be removed. The code would work just fine without it.
‘Use Relative Reference’ button in the Developer tab is a toggle button. You can turn it off (and switch back to absolute reference) by clicking it.
What a Macro Recorder Cannot Do
Macro recorder is great at following you in Excel and recording your exact steps, but it may fail you when you need it to do more.
- You can’t execute a code without selecting the object. If you want the macro recorder to go to the next worksheet and highlight all the filled cells in column A, without leaving the current worksheet, then it won’t be able to do this. It’s because if I ask you to do this, even you won’t be able to do that (without leaving the current sheet). And if you can’t do it yourself, how will the macro recorder capture your actions. In such cases, you need to manually go and create/edit the code.
- You can’t create a custom function with a macro recorder. With VBA, you can create custom functions that you can use in the worksheet as regular functions. You can create this by writing the code manually.
- You can’t run codes based on Events: In VBA you can use many events – such as opening a workbook, adding a worksheet, double-clicking on a cell, etc, to run a code associated with that event. You can use a macro recorder to do this.
- You can’t create loops with a macro recorder. When you manually enter the code, you can leverage the power of loops in VBA (such as For Next, For Each Next, Do While, Do until). But you can’t do this when you record a macro.
- You can’t analyze conditions: You can check for conditions within the code using macro recorder. If you write a VBA code manually, you can use the IF Then Else statements to analyze a condition and run a code if true (or another code if false).
- You can’t pass arguments in a macro procedure: When you record a macro, it will never have any arguments. A subroutine can take input arguments that can be used within the macro to perform a task. While recording a macro, this can not be done as the recorded macros are independent and are not connected to any other existing macros.
Macro-Enabled File Extensions
When you record a macro, or you manually write VBA code in Excel, you need to save the file with a macro-enabled file extension (.xlsm).
Before Excel 2007, there was one single file format that used to suffice – .xls.
But from 2007 onwards, .xlsx was introduced as the standard file extension. The files that are saved as .xlsx cannot hold a macro in it. So if you have a file with .xlsx extension and you record/write a macro and save it, it will warn you to save it in macro-enabled format, and show you a dialog (as shown below):
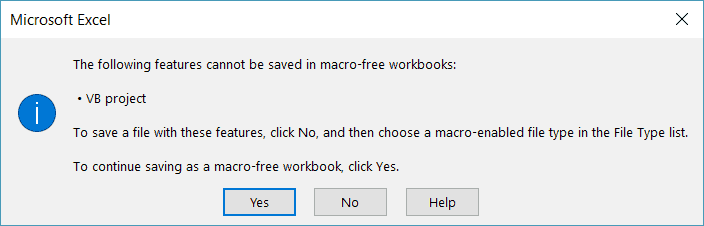
If you select No, Excel allows you to save it in a macro-enabled format. But if you click Yes, Excel will automatically remove all the code from your workbook and save it as a .xlsx workbook.
So if you have a macro in your workbook, you need to save it in the .xlsm format to keep that macro.
Different Ways to Run a Macro in Excel
So far, we have seen only one way to run a macro in Excel – which is using the Macro dialog box.
But there are a number of ways you can run macros.
- Run a Macro from the Ribbon (Developer Tab)
- Using a keyboard shortcut (which you have to assign)
- Assign the Macro to a Shape
- Assign the Macro to a Button
- Run a Macro from the VB Editor
- LConclusion – Record a Macro when Stuck
I already mentioned that a macro recorder is a useful tool for anybody working with VBA in Excel.
As you use the macro recorder a few times, you will notice that it spits out a lot of unnecessary code. However, it’s still useful and gives you some ideas on where to start. For example, if I ask you to filter a column of cells using VBA, and you have no idea what the syntax is, you can quickly record a macro and check out the code.
A macro recorder is an indispensable tool and even after years of VBA coding experience under my belt, I often resort to the macro recorder for help.
#evba #etipfree #eama #kingexcel📤How to Download ebooks: https://www.evba.info/2020/02/instructions-for-downloading-documents.html?m=1


Leave a Comment