
Excel VBA Error Handling – All You Need to Know!
Excel VBA Error Handling – All You Need to Know!
No matter how experienced you’re with VBA coding, errors are always going to be a part of it.
The difference between a novice and an expert VBA programmer is that the expert programmers know how to effectively handle and use errors.
In this tutorial, I will show you various ways you can use to handle errors effectively in Excel VBA.
Before we get into VBA error handling, let’s first understand the different types of errors you are likely to encounter when programming in Excel VBA.
This Tutorial Covers:
Types of VBA Errors in Excel
There are four types of errors in Excel VBA:
- Syntax errors
- Compilation errors
- Runtime errors
- Logical Errors
Let’s quickly understand what these errors are and when you’re likely to encounter these.
Syntax Error
A syntax error, as the name suggests, occurs when VBA finds something wrong with the syntax in the code.
For example, if you forget a part of the statement/syntax that is needed, then you will see the compile error.
In the below code, as soon as I hit enter after the second line, I see a compile error. This is because the IF statement needs to have the ‘Then‘ command, which is missing in the below code.

To make sure you see the syntax error whenever there is something missing, you need to make sure Autosyntax check is enabled. To do this, click on ‘Tools’ and then click on ‘Options’. In the options dialog box, make sure that the ‘Auto Syntax Check’ option is enabled.
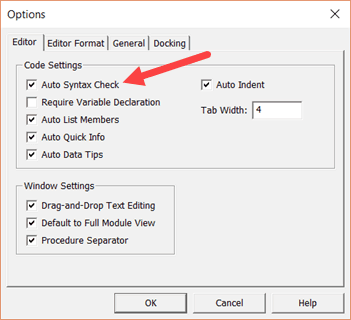
If the ‘Auto Syntax Check’ option is disabled, VBA will still highlight the line with the syntax error in red, but it will not show the error dialog box.
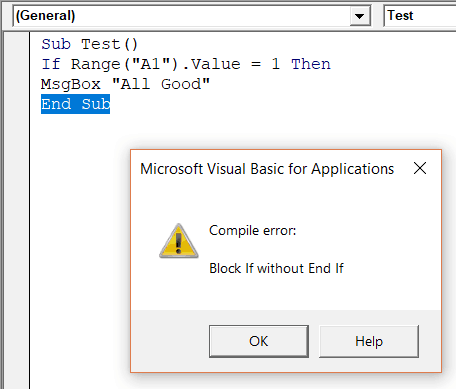
Compile Error
Compile errors occur when something is missing that is needed for the code to run.
For example, in the below code, as soon as I try to run the code, it will show the following error. This happens as I have used the IF Then statement without closing it with the mandatory ‘End If’.
VBA checks each line as you’re typing the code and highlights the syntax error as soon as the line is incorrect and you hit enter. Compile errors, on the other hand, are only identified when the entire code is analyzed by VBA.
Below are some scenarios where you’ll encounter the compile error:
- Using an IF Statement without the End IF
- Using For statement with the Next
- Using Select statement without using the End Select
- Not declaring the variable (this works only when Option Explicit is enabled)
- Calling a Sub/Function that does not exist (or with wrong parameters)
Run Time Errors
Runtime errors are those that occur when the code is running.
Run time errors will occur only when all the syntax and compile errors are being taken care of.
For example, if you run code that is supposed to open an Excel workbook, but that workbook is unavailable (either deleted or name changed), your code would give you a runtime error.
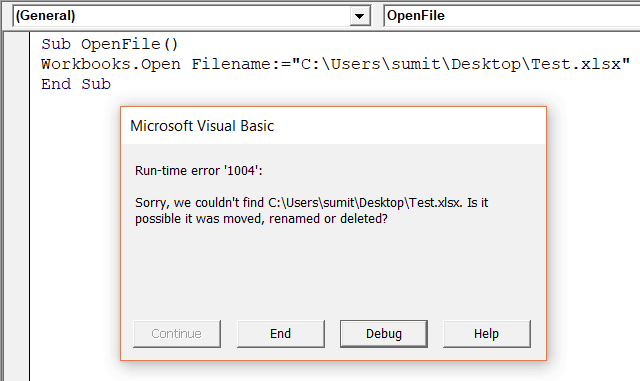
When a runtime error occurs, it will stop the code and show you the error dialog box.
The message in the Run-time error dialog box is a little more helpful. It tries to explain the problem that can help you correct it.
If you click on the Debug button, it will highlight the part of the code that is leading to the error.

If you have corrected the error, you can click on the Run button in the toolbar (or press F5) to continue running the code from where it left.
Or you can also click on the End button to come out of the code.
Logical Errors
Logical errors would not make your code stop but can lead to wrong results. These could also be the most difficult types of errors to troubleshoot.
These errors are not highlighted by the compiler and need to be manually tackled.
One example of logical error (that I often find myself stuck with) is running into an endless loop.
Another example could be when it gives a result which is wrong. For example, you may end up using a wrong variable in the code or add two variables where one is incorrect.
There are a few ways I use to tackle logical errors:
- Insert Message Box at some place in the code and highlight values/data that can help understand if eberything is going as expected.
- Instead of running the code at one go, go through each line one by one. To do this, click anywhere in the code and press F8. you would notice that each time you press F8, one line gets executed. This allows you to go through the code one line at a time and identify the logical errors.
Using Debug to Find Compile/Syntax Errors
Once you’re done with the code, it’s a good practice to first compile it before running.
To compile a code, click on the Debug option in the toolbar and click on Compile VBAProject.
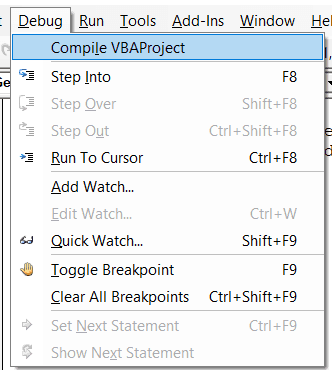
When you compile a VBA project, it goes through the code and identifies errors (if any).
In case it finds an error, it will show you a dialog box with the error. It finds errors one by one. So if it finds an error and you have corrected it, you need to run compile again to find other errors (if there are).
When you’re code is free of errors, the Compile VBAProject option will be greyed out.
Note that Compiling will only find ‘Syntax’ errors and ‘Compile’ errors. It will NOT find the run-time errors.
When you’re writing VBA code, you don’t want the errors to crop up. To avoid this, there are many error-handling methods you can use.
In the next few sections of this article, I will be covering the methods you can use for VBA error handling in Excel.
Configure Error Settings (Handled Vs Unhandled Errors)
Before you start working with your code, you need to check for one setting in Excel VBA.
Go to the VBA toolbar and click on Tools and then click on Options.
In the Options dialog box, click on the General tab and make sure that within the ‘Error Trapping’ group, ‘Break on Unhandled Errors’ is checked.
Let me explain the three options:
- Break on All Errors: This will stop your code on all types of errors, even when you have used the techniques to handle these errors.
- Break in Class Module: This will stop your code on all unhandled errors, and at the same time, if you’re using objects such as Userforms, it will also break within those objects and highlight the exact line causing the error.
- Break on Unhandled Errors: This will stop your code only for those errors that are not handled. This is the default setting as it ensures any unhandled errors are brought to your notice. If you’re using objects such as Userforms, this will not highlight the line causing the error in the object, but will only highlight the line that’s referring to that object.
So in a nutshell – if you’re just starting with Excel VBA, ensure ‘Break on Unhandled Errors’ is checked.
VBA Error Handling with ‘On Error’ Statements
When your code encounters an error, there are a few things you can do:
- Ignore the error and let the code continue
- Have an error handling code in place and run it when an error occurs
Both of these error handling methods ensures that the end user will not get to see an error.
There are a few ‘On Error’ statements that you can use to get these done.
On Error Resume Next
When you use ‘On Error Resume Next’ in your code, any encountered error will be ignored and the code will continue to run.
This error handling method is used quite often, but you need to be cautious when using it. Since it completely ignores any error that may occur, you may not be able to identify the errors that need to be corrected.
For example, if the below code is run, it will return an error.
Sub AssignValues()
x = 20 / 4
y = 30 / 0
End Sub
This happens because you can not divide a number by zero.
But if I use the ‘On Error Resume Next’ statement in this code (as shown below), it will ignore the error and I will not know that there is an issue that needs to be corrected.
Sub AssignValues()
On Error Resume Next
x = 20 / 4
y = 30 / 0
End Sub
On Error Resume Next should be used only when you clearly know the kind of errors your VBA code is expected to throw and it’s alright to ignore it.
For example, below is the VBA event code that would instantly add the date and time value in cell A1 of a newly inserted sheet (this code is added in the worksheet and not in a module).
Private Sub Workbook_NewSheet(ByVal Sh As Object)
Sh.Range("A1") = Format(Now, "dd-mmm-yyyy hh:mm:ss")
End Sub
While this works great in most cases, it would show an error if I add a chart sheet instead of a worksheet. Since a chart sheet does not have cells, the code would throw an error.
So, if I use the ‘On Error Resume Next’ statement in this code, it will work as expected with worksheets and do nothing with chart sheets.
Private Sub Workbook_NewSheet(ByVal Sh As Object)
On Error Resume Next
Sh.Range("A1") = Format(Now, "dd-mmm-yyyy hh:mm:ss")
End Sub
Note: On Error Resume Next Statement is best used when you know what kind of errors you’re likely to encounter. And then if you think it’s safe to ignore these errors, you can use it.
You can take this code to the next level by analyzing if there was an error, and displaying a relevant message for it.
The below code would show a message box that would inform the user that a worksheet has not been inserted.
Private Sub Workbook_NewSheet(ByVal Sh As Object)
On Error Resume Next
Sh.Range("A1") = Format(Now, "dd-mmm-yyyy hh:mm:ss")
If Err.Number <> 0 Then
MsgBox "Looks like you inserted a chart sheet" & vbCrLf & "Error - " & Err.Description
End If
End Sub
‘Err.Number’ is used to get the error number and ‘Err.Description’ is used to get the error description. These will be covered later in this tutorial.
On Error GoTo 0
‘On Error GoTo 0’ will stop the code on the line that causes the error and shows a message box that describes the error.
In simple terms, it enables the default error checking behavior and shows the default error message.
Then why even use it?
Normally, you don’t need to use ‘On Error Goto 0’, but it can be useful when you use it in conjunction with ‘On Error Resume Next’
Let me explain!
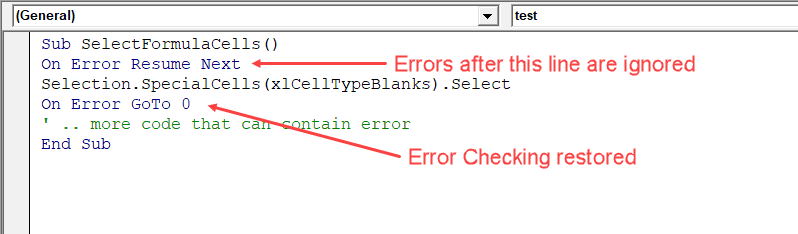
The below code would select all the blank cells in the selection.
Sub SelectFormulaCells()
Selection.SpecialCells(xlCellTypeBlanks).Select
End Sub
But it would show an error when there are no blank cells in the selected cells.
So to avoid showing the error, you can use On Error Resume next’
Now, it will also show any error when you run the below code:
Sub SelectFormulaCells()
On Error Resume Next
Selection.SpecialCells(xlCellTypeBlanks).Select
End Sub
So far, so good!
The problem arises when there is a part of the code where error can occur, and since you’re using ‘On Error Resume Next’, the code would simply ignore it and move to the next line.
For example, in the below code, there would no error prompt:
Sub SelectFormulaCells()
On Error Resume Next
Selection.SpecialCells(xlCellTypeBlanks).Select
' .. more code that can contain error
End Sub
In the above code, there are two places where an error can occur. The first place is where we are selecting all blank cells (using Selection.SpecialCells) and the second is in the remaining code.
While the first error is expected, any error after that is not.
This is where On Error Goto 0 comes to rescue.
When you use it, you reset the error setting to default, where it will start showing errors when it encounters it.
For example, in the below code, there would be no error in case there are no blank cells, but there would be an error prompt because of ’10/0′
Sub SelectFormulaCells()
On Error Resume Next
Selection.SpecialCells(xlCellTypeBlanks).Select
On Error GoTo 0
' .. more code that can contain error
End Sub
On Error Goto [Label]
The above two methods – ‘On Error Resume Next’ and ‘On Error Goto 0’ – doesn’t allow us to truly handle the error. One makes the code ignore the error and the second one resume error checking.
On Error Go [Label] is a way with which you can specify what you want to do in case your code has an error.
Below is the code structure that uses this error handler:
Sub Test()

On Error GoTo Label:
X = 10 / 0    'this line causes an error
' ....your remaining code goes here
Exit Sub

Label:
    ' code to handle the error
End Sub
Note that before the Error handling ‘Label’, there is an Exit Sub. This ensures that in case there are no errors, the sub is exited and the ‘Label’ code is not executed. In case you don’t use Exit Sub, it will always execute the ‘Label’ code.
In the example code below, when an error occurs, the code jumps and executes the code in the handler section (and shows a message box).
Sub Errorhandler()
On Error GoTo ErrMsg
X = 12
Y = 20 / 0
Z = 30
Exit Sub
ErrMsg:
MsgBox "There seems to be an error" & vbCrLf & Err.Description
End Sub
Note that when an error occurs, the code has already run and executed the lines before the line causing the error. In the above example, the code sets the value of X as 12, but since the error occurs in the next line, it doesn’t set the values for Y and Z.
Once the code jumps to the error handler code (ErrMsg in this example), it will continue to execute all the lines in and below the error handler code and the exit the sub.
On Error Goto -1
This one is a bit complicated, and in most cases, you’re unlikely to use this.
But I will still cover this as I have faced a situation where this was needed (feel free to ignore and jump to the next section if you’re only looking for basics).
Before I get into the mechanics of it, let me try and explain where can it be useful.
Suppose you have a code where an error is encountered. But all is good as you have one error handler in place. But what happens when there is another error in the error handler code (yeah.. somewhat like the inception movie).
In such a case, you can not use the second handler as the first error has not been cleared. So while you have handled the first error, in VBA’s memory it still exists. And the VBA memory only has a place for one error – not two or more than that.
In this scenario, you can use On Error Goto -1.
It clears the error and frees up VBA memory to handle the next error.
Enough talk!
Let’s me explain now by using examples.
Suppose I have the below code. This will throw an error as there is division by zero.
Sub Errorhandler()
X = 12
Y = 20 / 0
Z = 30
End Sub
So to handle it, I use an error handler code (with the name ErrMsg) as shown below:
Sub Errorhandler()

On Error GoTo ErrMsg

X = 12
Y = 20 / 0
Z = 30
Exit Sub

ErrMsg:
MsgBox "There seems to be an error" & vbCrLf & Err.Description
End Sub
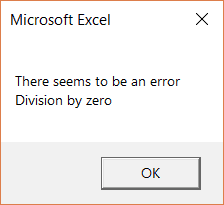
All is good now again. As soon as the error occurs, the error handler is used and shows a message box as shown below.
Now, I expand the code so that I have more code in or after the error handler.
Sub Errorhandler()

On Error GoTo ErrMsg

X = 12
Y = 20 / 0
Z = 30
Exit Sub

ErrMsg:
MsgBox "There seems to be an error" & vbCrLf & Err.Description
A = 10 / 2
B = 35 / 0
End Sub
Since the first error has been handled but the second has not been, I again see an error as shown below.
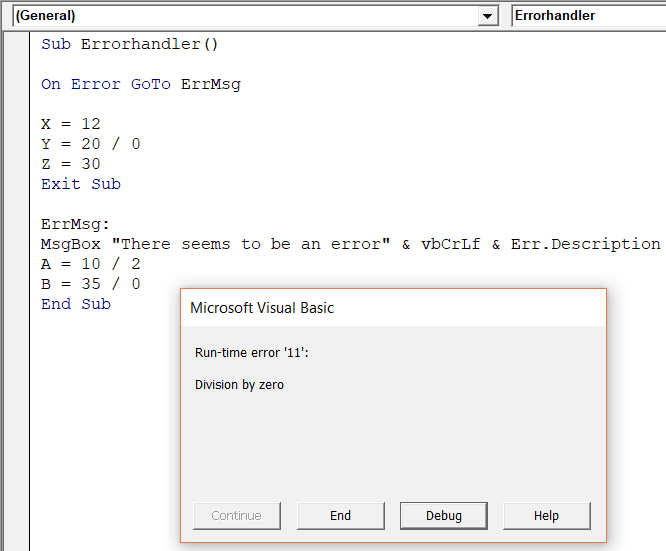
Still all good. The code is behaving in the way we expected it to.
So to handle the second error, I use another error handler (ErrMsg2).
Sub Errorhandler()

On Error GoTo ErrMsg

X = 12
Y = 20 / 0
Z = 30
Exit Sub

ErrMsg:
MsgBox "There seems to be an error" & vbCrLf & Err.Description
On Error GoTo ErrMsg2
A = 10 / 2
B = 35 / 0
Exit Sub

ErrMsg2:
MsgBox "There seems to be an error again" & vbCrLf & Err.Description

End Sub
And this is where it doesn’t work as expected.
If you run the above code, it will still give you a run-time error, even after having the second error handler in place.
This happens as we didn’t clear the first error from VBA’s memory.
Yes, we handled it! But it still remains in the memory.
And when VBA encounters another error, it’s still stuck with the first error, and hence the second error handler is not used. The code stops at the line that caused the error and shows the error prompt.
To clear VBA’s memory and clear the previous error, you need to use the ‘On Error Goto -1’.
So if you add this line in the below code and run it, it will work as expected.
Sub Errorhandler()

On Error GoTo ErrMsg
X = 12
Y = 20 / 0
Z = 30
Exit Sub

ErrMsg:
MsgBox "There seems to be an error" & vbCrLf & Err.Description
On Error GoTo -1
On Error GoTo ErrMsg2
A = 10 / 2
B = 35 / 0
Exit Sub

ErrMsg2:
MsgBox "There seems to be an error again" & vbCrLf & Err.Description

End Sub
The Err Object
Whenever an error occurs with a code, it’s the Err object that is used to get the details about the error (such as the error number or the description).
Err Object Properties
The Err Object has the following properties:
| Property | Description |
| Number | A number that represents the type of error. When there is no error, this value is 0 |
| Description | A short description of the error |
| Source | Project name in which the error has occurred |
| HelpContext | The help context id for the error in the help file |
| HelpFile | A string that represents the folder location and the file name of the help file |
While in most cases you don’t need to use Err object, it can sometimes be useful while handling errors in Excel.
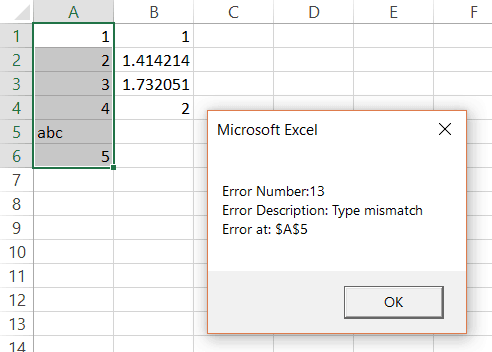
For example, suppose you have a dataset as shown below and for each number, in the selection, you want to calculate the square root in the adjacent cell.
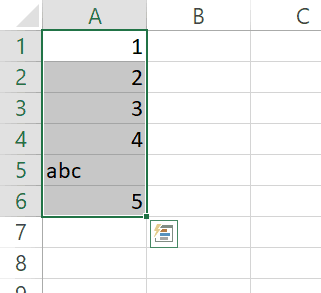
The below code can do it, but since there is a text string in cell A5, it shows an error as soon as this occurs.
Sub FindSqrRoot()
Dim rng As Range
Set rng = Selection

For Each cell In rng
    cell.Offset(0, 1).Value = Sqr(cell.Value)
Next cell

End Sub

The problem with this type of error message is that it gives you nothing about what has gone wrong and where the issue occurred.
You can use the Err object to make these error messages more meaningful.
For example, if I now use the below VBA code, it will stop the code as soon as the error occurs and show a message box with the cell address of the cell where there is an issue.
Sub FindSqrRoot()
Dim rng As Range
Set rng = Selection

For Each cell In rng
    On Error GoTo ErrHandler
    cell.Offset(0, 1).Value = Sqr(cell.Value)
Next cell

ErrHandler:
MsgBox "Error Number:" & Err.Number & vbCrLf & _
    "Error Description: " & Err.Description & vbCrLf & _
    "Error at: " & cell.Address

End Sub
The above code would give you a lot more information than the simple ‘Type Mismatch’, especially the cell address so that you know where the error occurred.
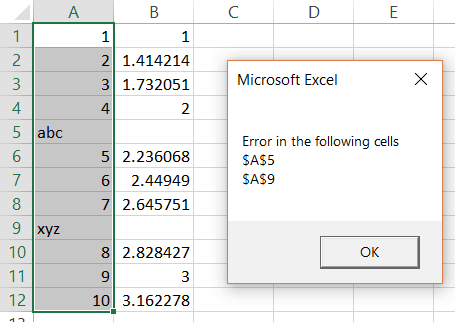
You can further refine this code to make sure your code runs until the end (instead of breaking at each error) and then gives you a list of cell address where the error occurs.
The below code would do this:
Sub FindSqrRoot2()
Dim ErrorCells As String
Dim rng As Range

On Error Resume Next

Set rng = Selection
For Each cell In rng
cell.Offset(0, 1).Value = Sqr(cell.Value)

If Err.Number <> 0 Then
ErrorCells = ErrorCells & vbCrLf & cell.Address
On Error GoTo -1
End If
Next cell
MsgBox "Error in the following cells" & ErrorCells
Exit Sub

End Sub
The above code runs until the end and gives the square root of all the cells that have numbers in it (in the adjacent column). It then shows a message that lists all the cells where there was an error (as shown below):
Err Object Methods
While the Err properties are useful to show useful information about the errors, there are two Err methods as well that can help you with error handling.
| Method | Description |
| Clear | Clears all the property settings of the Err object |
| Raise | Generates a run-time error |
Let’s quickly learn what these are and how/why to use these with VBA in Excel.
Err Clear Method
Suppose you have a dataset as shown below and you want to get the square root of all these numbers in the adjacent column.
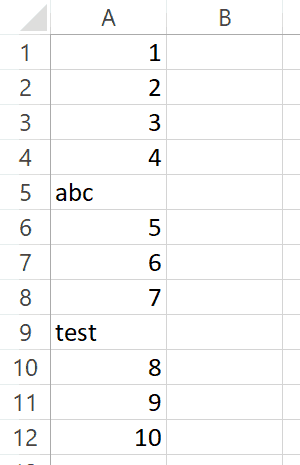
The following code will get the square roots of all the numbers in the adjacent column and show a message that an error occurred for cell A5 and A9 (as these have text in it).
Sub FindSqrRoot2()
Dim ErrorCells As String
Dim rng As Range

On Error Resume Next

Set rng = Selection
For Each cell In rng
cell.Offset(0, 1).Value = Sqr(cell.Value)

If Err.Number <> 0 Then
ErrorCells = ErrorCells & vbCrLf & cell.Address
Err.Clear
End If
Next cell
MsgBox "Error in the following cells" & ErrorCells

End Sub
Note that I have used the Err.Clear method within the If Then statement.
Once an error has occurred and trapped by the If condition, Err.Clear method resets the error number back to 0. This ensures that IF condition only trap the errors for cells where it is raised.
Had I not used the Err.Clear method, once the error occurs, it would always be true in the IF condition, and the error number has not been reset.
Another way of making this work is by using the On Error Goto -1, which resets the error completely.
Err Raise Method
The Err.Raise method allows you to raise a run-time error.
Below is the syntax of using the Err.Raise method:
Err.Raise [number], [source], [description], [helpfile], [helpcontext]
All these arguments are optional and you can use these to make your error message more meaningful.
But why would you ever want to raise an error yourself?
Good question!
You can use this method when there is an instance of an error (which means that there is going to an error anyway) and then you use this method to tell the user more about the error (instead of the less helpful error message that VBA shows by default).
For example, suppose you have a dataset as shown below and you want all the cells to have numeric values only.
Sub RaiseError()
Dim rng As Range
Set rng = Selection

On Error GoTo ErrHandler

For Each Cell In rng
If Not (IsNumeric(Cell.Value)) Then
Err.Raise vbObjectError + 513, Cell.Address, "Not a number", "Test.html"
End If
Next Cell

ErrHandler:
MsgBox Err.Description & vbCrLf & Err.HelpFile
End Sub
The above code would show an error message that has the specified description and the context file.
Personally, I have never used Err.Raise as I mostly work with Excel only. But for someone who uses VBA to work with Excel along with other applications such as Outlook, Word or PowerPoint, this can be useful.
Here is a detailed article on Err.Raise method in case you want to learn more.
VBA Error Handling Best Practices
No matter how skilled you get a writing VBA code, errors are always going to be a part of it. The best coders are those who have the skills to handle these errors properly.
Here are some best practices you can use when it comes to error handling in Excel VBA.
- Use ‘On Error Go [Label]’ at the beginning of the code. This will make sure any error that can happen from there is handled.
- Use ‘On Error Resume Next’ ONLY when you’re sure about the errors that can occur. Use it with expected error only. In case you use it with unexpected errors, it will simply ignore it and move forward. You can use ‘On Error Resume Next’ with ‘Err.Raise’ if you want to ignore a certain type of error and catch the rest.
- When using error handlers, make sure you’re using Exit Sub before the handlers. This will ensure that the error handler code is executed only when there is an error (else it will always be executed).
- Use multiple error handlers to trap different kinds of errors. Having multiple error handler ensures that an error is properly addressed. For example, you would want to handle a ‘type mismatch’ error differently than a ‘Division by 0’ run-time error.
Hope you found this Excel article useful!
#evba #etipfree #kingexcel 📤You download App EVBA.info installed directly on the latest phone here : https://www.evba.info/p/app-evbainfo-setting-for-your-phone.html?m=1
#evba #etipfree #kingexcel


Leave a Comment