
Create Data Validation lists from Unsorted data with duplicates in Excel [How To]
Create Data Validation lists from Unsorted data with duplicates in Excel [How To]
Today I finally decided to make an Excel dashboard on debtors aging analysis. The main reasons to do this dashboard were that:
- I thought now enough knowledge has been delivered to my cult followers that they will understand the ins and outs of making this dashboard; and
- that majority of computational work was already done in the shape of my old tutorial where learnt how to make aging analysis report in Excel.
Download Tutorial Workbook
Please download this sample Excel tutorial workbook that goes with this tutorial and will help you do the steps we explained later in this article
But soon it was dawned upon me that not everything has already been discussed that is needed. So consider this article to be the second article of the Aging Analysis Dashboard Series. The first one being the base article in which aging calculation was done.
As with any dashboard the list of requirements was developed and one of such requirement was to get the data validated list of customers. It was seemingly easy task as I have already discussed how to create drop-down lists using data validation lists in many of my articles.
So here is what I did:
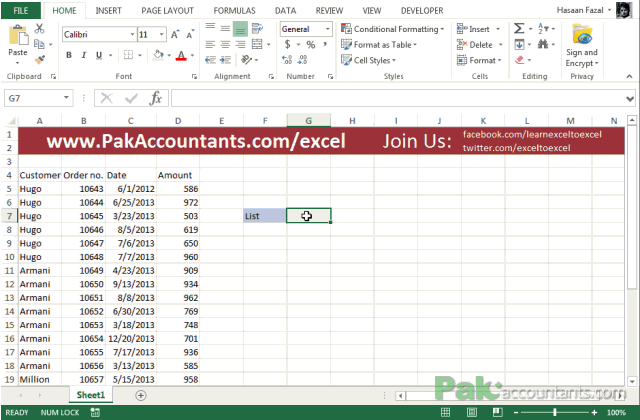
But things were NOT so simple and a big question mark dropped on my head when I clicked the drop down arrow button. Have a look at the result and see what kind of list I got. That is definitely not what we wanted:

So why it happened. If you download the file and open it you will see that customers’ names are repeated as in reality we can have many transactions with the same customer in a period. Also the data is sorted according to the date transaction occurred and not according to customers’ names. So we have two problems now:
- One: the data is unsorted and that will make lists ugly as lists are meant to be in alphabetical order.
- Two: We have duplication of names because of multiple transactions with the same customer. So if we use this data the same customer will be listed multiple times in the list whereas one customer should be listed only once.
Though we can easily fix the first problem by sorting the data. But the second problem is still there.
View Contents [hide]
- Use Remove Duplicate Tool
- Pivot Tables + Data Validation = Awesome Lists!
- Don’t forget to checkout more of our articles on:
Use Remove Duplicate Tool
One way is to copy the whole column containing customers’ names in another column or worksheet and run Remove duplicates command from the ribbon. Following animation shows how this command works:
This will leave us with unique values and we can use them to make our drop down list. Which we can use to make drop down list as the following animation shows:

But this approach has one serious caveat. Well at least I consider it really serious and that is what if data grows in the future and more customers are added? In that case we will have to create new drop down list every time a transaction takes place with a new customer.
So this is a plausible solution but not a good one. I needed a more dynamic and future proof approach and I found that solution is pivoted on Excel’s Pivot Tables.
Pivot Tables + Data Validation = Awesome Lists!
I must say that Pivot tables are not really used for this purpose but so far data validation tools is still without an option to consider only unique values and ignore duplicates like we have an option to ignore blanks.
So the basic idea is that we will make a small pivot table containing just customers’ names. Pivot tables are awesome in so many ways but one no TWO great deals about it are:
- It removes the duplicates automatically and only fetch unique values as it can count the repetitive entries and take them as one.
- It sort the data in alphabetical order automatically.
So this ONE solution is automatically solving TWO of our problems. But we still need to learn:
- firstly how to make the required pivot table? and
- secondly how to get the drop-down list on the basis of this pivot table?
Follow these steps to get this done:
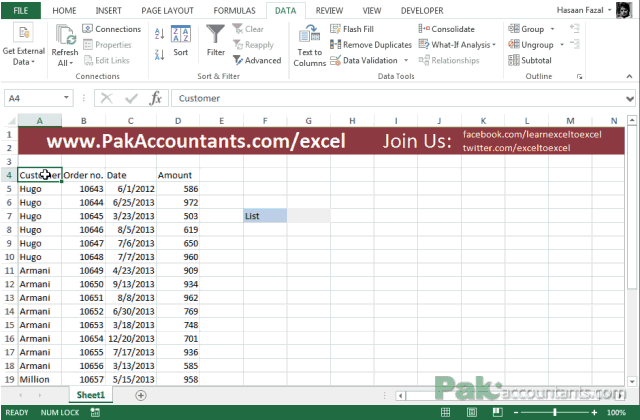
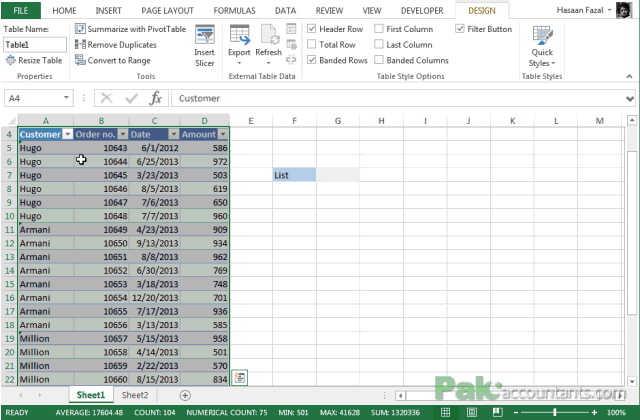
Step 1: Select the data containing customers, dates, invoice numbers and amounts by hitting Ctrl+A and convert it to a Table by hitting Ctrl+T. A dialogue box will show up. Make sure “my table has headers” option is ticked. Click OK. This will make our source dynamic and anything based on this table will also be dynamic.

Step 2: Select the table again if it is not selected and go to Insert tab > Tables group > click Pivot table button. This will invoke create pivot table dialogue box. You can give it a name and choose it to be on existing worksheet or new. Just ignore and simply click OK button. This will move you to new worksheet with pivot table options.
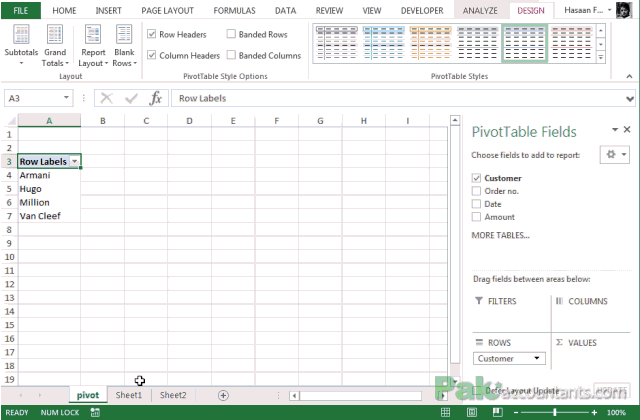
Step 3: From the options above left click HOLD and drag the value to rows box below. This will get you customers’ names sorted and without repetition.
Step 4: Have an active cell inside pivot table, go to Design tab > layout group > click grand totals drop-down > click off for rows and columns. This will remove the grand total row from pivot table.

Step 5: Right click on the worksheet tab and rename it to pivot.

Step 6: Now go to the cell where you want drop down list. I want it to be on the same worksheet where my original data is. Go to Data tab > Data tools group > click data validation tool button. This will open up data validation dialogue. From allow drop down select list and in source input field put this formula:
=OFFSET(pivot!$A$4,0,0,COUNTA(pivot!$A:$A)-1)
Following animation also shows how this formula is actually put in place.
Now as I said that data input source is dynamic so if add any new customer and refresh the pivot table my drop down list will update automatically and thus saves me the hassle of doing the whole process again.

But remember once the underlying data is changed you have to refresh the pivot table.
So here you are one step closer to make your first ever Excel dashboard. We will be continuing on Aging analysis dashboard from this point in the future.
📤You download App EVBA.info installed directly on the latest phone here : https://www.evba.info/p/app-evbainfo-setting-for-your-phone.html?m=1


Leave a Comment